- Home
- Learn Linux
- Learn Electronics
- Raspberry Pi
- Programming
- Projects
- LPI certification
- News & Reviews

Google Ads
KidSafe is no longer under active development. It is left here for historical reasons and for anyone that is still running the code, but will not have any future updates based on teh current codebase.
This is a guide to installing the free KidSafe Internet filter software and proxy server onto the Raspberry Pi.
Kidsafe provides a way to keep your family secure on the Internet. It restricts the sites that your children can visit to those that are considered safe, still allowing the parent to allow the child to continue when appropriate. The parent is in control of what the child does on the Internet.
KidSafe is a program designed to be installed on a squid proxy server that provides control over who is able to access which web sites. A proxy sits between the user's computer and the Internet and in this case only permits sites that the user is authorised to access. This is not a firewall although some firewalls do include this functionality.
KidSafe uses connects to existing free and open source software, specifically running on Linux based operating system (Raspbian) and using the squid proxy, lighttpd webserver and mysql server.
Kidsafe can be installed on any Linux based computer. It is particularly suited to running on the Raspberry Pi which provides a low cost, energy efficient computer suitable for home use. The install of the current version involves a number of steps and needs a little familiarisation with Linux and configuring on the command line. It is currently recommended for those with experience in Linux and mysql, but a version that is easier to install and use will be made available in future.
To learn more about Linux on the Raspberry Pi see the Raspberry Pi guides.
This is based on the GNU/Linux Debian Raspberry Pi Raspbian operating system. The raspi-config tool will run at first startup, or can be run using
sudo raspi-config
The main things to change are to expand the filesystem to use the full SD card and to change the memory for the GPU to a reduced amount (eg. 16MB).
After installing the operating system we can give the Raspberry Pi an static IP address. By default the Raspberry Pi will request a dynamic IP address which is issued by your router as required. This however may change in future which would mean having to reconfigure all the client computers. Instead we provide it with an address that doesn't change such as 192.168.1.3.
Note that this address can be used on the local network which is all we need here as the router will provide the translation for outgoing connections.
First find out what DHCP address has been allocated. This is shown at the end of the startup of the operating system, but can also be found using the ifconfig command – see the extract below
...

eth0      Link encap:Ethernet  HWaddr b8:27:eb:8a:71:a0

          inet addr:192.168.1.110  Bcast:192.168.1.255  Mask:255.255.255.0

...
This is saying that the ethernet port 0 has an IP address of 192.168.1.110
You will also need to find out what address your router is, using the route command
$ route

Kernel IP routing table

Destination     Gateway         Genmask         Flags Metric Ref    Use Iface

default         192.168.1.1     0.0.0.0         UG    0      0        0 eth0

192.168.1.0     *               255.255.255.0   U     0      0        0 eth0
This shows that the router IP address (Gateway) is 192.168.1.1 and all traffic is sent via that router.
At this point you will also need to check on what address range is being issued by the router. This depends upon the individual router. In my case I have a Belkin Wireless Router which can be reached by pointing a web browser to the IP address of the router 192.168.1.1
The LAN settings are shown below:
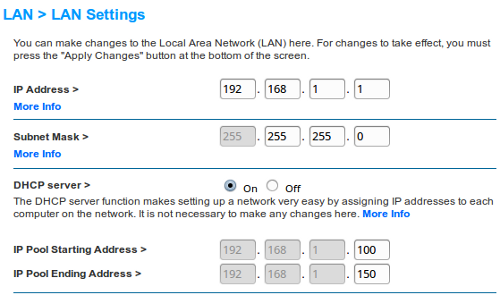
In this case the local network has valid addresses from 192.168.1.1 to 192.168.1.254. The router is at address 192.168.1.1 and any DHCP requests will be given entries between 192.168.1.100 and 192.168.1.150 (you can change the range of the DHCP addresses if required). I have used 192.168.1.3 for this server.
To change to static IP address
cd /etc/network

sudo nano interfaces
replace the line "iface eth0 inet dhcp" with
iface eth0 inet static

address 192.168.1.3

netmask 255.255.255.0

gateway 192.168.1.1
You should also take a look at the file /etc/resolv.conf
and check it has a nameserver entry (probably pointing at your default gateway)
nameserver 192.168.1.1
Alternatively you could point directly at your ISPs DNS servers instead.
Whilst you can dynamically reload the network interface I suggest a reboot at this stage to make sure that the configuration is correct.
sudo reboot
After logging in check using ifconfig to confirm that we have a static ip address
...

eth0      Link encap:Ethernet  HWaddr b8:27:eb:8a:71:a0

          inet addr:192.168.1.3  Bcast:192.168.1.255  Mask:255.255.255.0

...You can now connect to the Raspberry pi remotely (on the same network) via ssh.
If you have another linux computer on the network then from a terminal run
ssh 192.168.1.3
which will login with the same username. If you want to use a different username then prefix that before the ip address with an @ sign.
eg
ssh pi@192.168.1.3
If you want to connect from Windows then there are several options, but I suggest the open source software Putty.
As long as the proxy servers are properly configured on the clients all web traffic will go through the kidsafe filter, however it would be easy to bypass by disabling proxies on the local computer. It is therefore recommended that the router be configured to block all outgoing Internet access except that coming from the IP address of the proxy server.
This differs depending upon the particular router and so you should follow the instructions provided with the router.
Here we are using the Squid proxy. There are two versions available in the Debian repositories and we specifically need version 3 or later.
sudo apt-get install squid3
We will configure squid later after adding the kidsafe application helper software.
A webserver is required for handling the login and authentication. Any web server that supports php will do, but I've chosen the lightweight webserver lighttpd which uses less resources than Apache (see guide to installing lighttpd).
To install the lighttpd web server issue the command.
sudo apt-get install lighttpd
This will install and start the web server.
[ ok ] Starting web server: lighttpd.
A database is required for storing the rules. I have used mysql as that is available in the repositories.
Mysql is the most popular database server, whilst there are other alternatives such as Mario DB (a fork of Mysql) or some which require less resources, most third party software for Linux is designed to use Mysql. It can be installed using
sudo apt-get install mysql-server
During the install you will be prompted for a password. Choose an appropriate password and make sure it is kept safe and not forgotten.
The password is for the mysql root user.
The following commands will install PHP version 5.
sudo apt-get install php5-common php5-cgi php5 php5-mysql
Note it's important to install in the order listed above. If you try to install php5 without first installing the php5-cgi package then it will install Apache as well, which we don't want for this light-weight lighttpd server.
To enable the server to handle php scripts the fastcgi-php module should be enabled by issuing in the command
sudo lighty-enable-mod fastcgi-php
Then reload the server using
sudo service lighttpd force-reload
Although not a requirement it is usually easier to configure mysql through the web application phpmyadmin rather than using the command line tool. I therefore suggest also installing phpmyadmin
sudo apt-get install phpmyadmin
This can be accessed by pointing a browser at the IP address with /phpmyadmin/
It is useful to change the permissions on the www directory to allow your user to update the webpages without needing to be root.
Change the directory owner and group
sudo chown www-data:www-data /var/www
allow the group to write to the directory
sudo chmod 775 /var/www
Add the pi user to the www-data group
sudo usermod -a -G www-data pi
You should logout and back in - to pick up group permissions, or if running X you can just start a new terminal.
Once the setup is complete you can access the web page by pointing your browser to the proxy IP address.
You should get a page back stating that it works, but that there is no content loaded.
Now that the pre-requisites are installed and the Raspberry Pi is at a known IP address we can install the additional code, configure the proxy server and create our initial users and rules.
The application helper can be downloaded below.
This includes the application helper itself (kidsafe.py), a squid configuration file to make configuring squid easier and the basic files for the rules and sessions. The files need to be installed into the /opt directory which needs to be performed as root (sudo). Assuming the file is downloaded in the pi home directory use.
cd /opt

sudo tar -zxvf /home/pi/kidsafe-squidapp-0.2.0.tgz
The only file that needs to be configured is the file kidsafe.squid3.inc. Any manual changes to the rules or sessions files will be overwritten by the application.
The include file is based on the IP address 192.168.0.3 if you have a different IP address you will need to edit the file /opt/kidsafe/kidsafe.squid3.inc and change the last line to your own IP address. You may also need to change the entry "acl local_acl dst 192.168.0.0/16" if you are on a different subnet.
The squid3 configuration file also needs to be updated to incorporate the squid include file.
As root (sudo) edit the file /etc/squid3/squid.conf and add the following line near the top of the configuration file before the line # TAG: dns_testnames
include /opt/kidsafe/kidsafe.squid3.inc
The files need to have the correct permissions to allow the web application to update the files. This can be done using the following commands.
cd /opt/kidsafe

sudo chown :www-data .

sudo chmod 775 .

sudo chown :proxy kidsafe.py

sudo chmod 770 kidsafe.py

sudo chown :www-data kidsafe.rules kidsafe.session

sudo chmod 664 kidsafe.rules kidsafe.session
Squid can now be restarted using
sudo service squid3 restart
The web application used for logging-on and adding rules needs to be installed within the lighttpd document root directory.
Download the file below
Install this into /var/www
cd /var/www

tar -xvzf /home/pi/kidsafe-webapp-0.2.0.tgz
There is a configuration file for the web application. From a security perspective it may be a good idea to change the password for mysql. This is not mandatory as logins are only permitted from the proxy computer, but would provide additional protection if mysql was wrongly configured.
The $nolocal variable is used to allow the local computer to connect to the proxy or in the event that connections are being tunneled through an ssh tunnel on the Raspberry Pi. Chances are if you don't understand what ssh tunnels are then you don't need to change this from the default true setting.
The code uses a mysql database for the rules and users which needs to be configured manually. This is easiest through the phpmyadmin web service (installed previously), although can be done from the command line mysql client if preferred.
First create the database kidsafe by clicking on Databases and then "Create new database".
Now create a new database user with the following settings:
Then in Database-specific privileges enter the following
Next click on the database on the left hand menu and use the SQL tab to execute the rules in the following file. Lines begining with # are comments and are not required, but they will help explain where default entries are being created.
cd /var/log/squid3

sudo touch kidsafe.log

sudo chown :www-data kidsafe.log
The logrotate script also needs to be updated to ensure that the logs keep the same permissions when the old logs are archived.
as root edit the file /etc/logrotate.d/squid3. After the line "test ! -e /var/run/squid3.pid || /usr/sbin/squid3 -k rotate" add the following:
# Create new log for kidsafe and set ownership

touch /var/log/squid3/kidsafe.log

chown proxy:www-data /var/log/squid3/kidsafe.log
The setup is now complete. The initial setup is in the most secure setting with only adults able to access any websites. The next guide shows how to add access to appropriate websites.
If upgrading from version 0.1.x then just untar the files into the appropriate directory as listed above. There are no changes required to the database for this version.

