- Home
- Learn Linux
- Learn Electronics
- Raspberry Pi
- Programming
- Projects
- LPI certification
- News & Reviews

Google Ads
The Raspberry Pi Linux computer can be used as a regular computer connected to a TV or monitor, but it's sometimes useful to use without any screen (headless). This maybe because you want to run it as a server, in a robot, or in a position where your HDMI cable cannot reach.
If you have installed onto a Raspberry Pi using the NOOBs image then you will have seen that you need a screen and keyboard (and optionally a mouse) to start the install process. You can however install without any of those physically attached.
The first thing to be aware is that it is far easier to perform the configuration with a monitor or TV attached, and in the case of a problem it's far easier to fix by being able to see the console messages. So if you are able to connect a monitor during install and then use it without a monitor attached then you may want to do that instenad.
This is based on the Debian Stretch distribution which is available to download as Raspbian Stretch with Desktop or Raspbian Lite. If there is a chance you may connect a screen at some point in the future then you may be better with the Desktop version, but if you are tight on SD Card space then the Lite option may be better.
The image downloads are available from: Raspberry Pi Raspbian Downloads
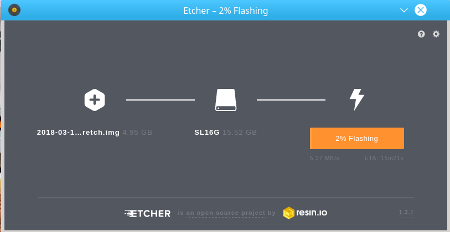
Download an unzip the files. You can then write them to the SD Card using a SD card tool such as Etcher or perform a binary copy to the SD Card (eg. using dd).
The SD card will now contain two partitions. One is the boot partition which can be used to provide parameters to Raspbian for when it starts up, and the other is rootfs which is the root partition. If using a Windows computer then only the boot partition will be visible.
This is going to assume you have a network that you can connect using an Ethernet cable and appropriate port on the Raspberry Pi (ie. not a Pi Zero or model A). Whislt it should be possible to configure wireless networking as far as I'm aware it is not possible through just editing files on the boot partition, or at least it's not working in the version I tried. This appears to be due to some hoops that need to be jumped-through regarding rfkill (used to disable radio frequency) and problems with the wpa_supplicant.conf file not being sufficient.
For now I will just provide details for the wired network, after which you can reconfigure for WiFi if required.
Using a wired Ethernet network is quite straight-forward, as in most cases it will pick up an IP address automatically. You'll still need to find the address that is asigned by DHCP and enable ssh (see later). Obviously this will only work for the Raspberry Pi versions with an Ethernet port (not the model A or Pi Zero models).
For security reasons SSH is disabled until it is turned on which is normally done through the raspi-config tool. We need to enable ssh during start-up which can also be done through creating a file called shh in the boot partition.
To connect to the Raspberry Pi you will need to know the IP address it has been assigned. To do this depends upon the specific router in question. On my Belkin Wireless router the option is called the DHCP client list which currently shows 12 entries one of which is obviously the Raspberry Pi.
192.168.1.111 raspberrypi b8:27:eb:a3:9f:46You could also try pinging IP addresses in the same subnet as another computer on the network until getting a response. For example if you have a laptop connected using dhcp and has an address of 192.168.1.33 - try counting upwards
ping 192.168.1.34
, .35, .36 - when you get one that replies to the pings then try
ssh pi@192.168.1.36
Or using PuTTY etc. (replacing the address with the IP address that responded to the ping test.
Normally it is sufficient to rely on a dynamic IP address at this stage, but if you do need a fixed IP address then you will need to mount the rootfs partition on a Linux computer edit the networking files there.
The SD card should now be placed into the Raspberry Pi and it should boot into Debian with the networking enabled. If there is a problem then you can look at the logs by moving the SD card back to a Linux computer and looking in the var/log directory.
We have now completed the initial configuration for the Raspberry Pi. You can now connect from a computer running any operating system using ssh. Linux distributions all have a native command line ssh client installed by default, but Windows users will need to install a separate application such as PuTTY.
To connect using ssh enter
ssh pi@192.168.1.6
at a command prompt (or enter the appropriate details into the GUI). This is asking to connect to ip address 192.168.1.6 with the username pi.
You will be prompted whether to accept the key that the ssh server provides. This is a security feature that prevents someone else from putting a different computer pretending to be yours so as to steal you username and password information. Choose yes to save the key.
Note that if you reinstall the operating system then this will warn you that someone may be pretending to be the same computer. In the case that you've knowingly re-installed the operating system you can delete the ssh key using the instructions provided.
Enter the password and you will now get to the command prompt. There will also be a message:
SSH is enabled and the default password for the 'pi' user has not been changed.

This is a security risk - please login as the 'pi' user and type 'passwd' to set a new password.
You should now run the passwd command as prompted to change the password.
pi@raspberrypi:~$ passwd

Changing password for pi.

(current) UNIX password:

Enter new UNIX password:

Retype new UNIX password:

passwd: password updated successfully

pi@raspberrypi:~$
Note that the password (or even *) are not shown when entering the passwords.
If you need to make any configuration changes (eg. if you are in a different country to the UK) then you can run
sudo raspi-config
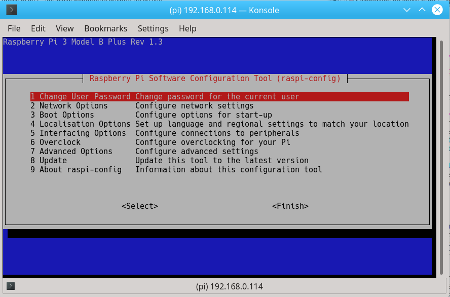
Some of the things you may want to do are:
To access the Raspberry Pi over the network you need to know its IP address. To do that you most likely had to login to your router (although you could have guessed if you knew the addresses of other computers on your network). Instead it is usually easier to give it a fixed IP address that doesn't change. This can sometimes be done through your router, but I'm going to show you how to set this directly on the Raspberry Pi.
To change to a static IP address you should update the /etc/dhcpcd.conf file which allows you to specify static addressing.
sudo nano /etc/dhcpcd.conf
add the following entries to the bottom of the file, substituting your own IP addresses as appropriate.
interface eth0

inform 192.168.0.6

static routers=192.168.0.1

static domain_name_servers=8.8.8.8 4.4.4.4
For the domain_name_servers entry I have used the Google DNS servers, but you may prefer to use your local router or ISP DNS servers.
As you are connected over the network you will reboot at this stage and then login on the new IP address using ssh.
sudo reboot
So far we have setup ssh which provides a command line for communicating with the Raspberry Pi and can be used for transfering files (scp and sftp). If you prefer to use a GUI then you can enable boot to desktop from raspi-config startup and VNC from interface options.
You can then connect with a VNC client.

