- Home
- Learn Linux
- Learn Electronics
- Raspberry Pi
- Programming
- Projects
- LPI certification
- News & Reviews

Google Ads
This provides details of how to configure a Raspberry Pi as a webserver. This is similar to the guide to using Ubuntu as a LAMP webserver, but adds some of the things that need to be handled differently for the Raspberry Pi.
It is termed a LAMP server which is one of the most common configuration for webservers which standard for:
Linux – operating system
Apache – webserver (http) software
Mysql – database server (recently this is often replaced by Maria)
PHP or Perl – programming languages
This setup is probably overkill for most uses of the Raspberry Pi, but it is the setup that most users will be familiar with and is a good way to learn about setting up a webserver. If you want a more basic (less resource intensive) version then try Running a lightweight webserver on the Raspberry Pi
In this guide the configuration is done at the command line. This may not be quite as easy as clicking a few icons, but it has many advantages, including the ability to remotely manage and install the server. It also means that the computer can spend more of it’s time server up web pages and less processor time drawing a GUI, which is after all the whole point of a webserver.
 The Raspberry Pi is a low power computer and so is useful to use in place of a more power hungry computer; it's a great way to learn Linux through practical application and a good way to learn web programming.
The Raspberry Pi is useful as a device for collecting information from various sensors. A web server can be a good way of making that information available, perhaps via the Internet of Things (IoT).
You could use it as a dedicated network service for the home. Perhaps streaming videos / media etc.
This is based on the Raspbian Raspberry Pi NOOBS image from Raspberry Pi download page.
To follow this then the Raspberry Pi will need to have an Internet connection. These instructions assume that it is physically connected to a home router.
The first priority is to make the Raspberry Pi a little more secure. The image includes a default username and password, which once connected to the Internet would allow anyone to login and have free roam of the device.
To change the password for the pi user after logging in issue
passwd
and follow the prompts for changing the password.
You may also want to add your own username. I have used user1 as the username, but typically this will be a persons name. You can skip this and go straight to the performance / networking steps if this is not required.
This will add a new user and change their password.
sudo useradd -m user1

sudo passwd user1
Here you will see the first use of the sudo command which we will be using a lot. As used above the sudo command allows the user to issue a command as the superuser. Without using the sudo command this would fail as regular users are not allowed to create other users. This is a security feature that protects the system from other users, but also limits the amount of damage that a user can do by mistake (although if prefixed with the sudo command it will not help against accidents).
The new user will need to be added to certain groups to allow the same privileges that the pi user had.
You can add the new user to the groups using the usermod command or you can edit the file directly. I’ve done the following by editing the file so that you can see the file (it’s also arguably a little quicker as you can make multiple changes whilst editing the file). Please be aware that when editing files like these a mistake can result in not being able to login.
There are two command line text editors. The nano editor is the easiest for new users (so that’s what I’ve referred to below), but I do recommend learning the vi text editor as it is useful tool that is installed on all linux systems. If you are familiar with vi then replace nano with vi for the rest of this guide.
sudo nano /etc/group
Go through the file adding ,user1 to the end of all of the groups that pi is in.
eg
adm:x:4:pi,user1
Use CTRL-O to save and CTRL-X to quit after editing the file.
The most important is the adm and sudo entries as without those the user will not be able to run sudo and hence perform any system administration. Of course if you want to add a different user and don’t want to give them admin access then you don’t need to make any updates to the /etc/group file.
type
exit
to logout and now login under the new username to check that it is working correctly.
By default the shell for the new user is the bourne shell. The bash shell is an improvement on that allowing the user of the arrow keys on the command line and autocompletion.
To set the default shell for you new account use:
chsh -s /bin/bash user1
You could now remove the pi username if it is no longer required.
userdel pi
This is just the initial stages in making the Pi more secure. There are other aspects to Linux security including making sure that appropriate security fixes are applied as they become available (eg. apt-get update).
Performance tuning is something that you would normally leave until later, but in the case of the Raspberry Pi there is an single option that can be done to improve performance for servers. By configuring it here we can let it get picked up by the reboot later saving us from having to reboot the server.
The Raspberry Pi has up to 1Gb of RAM. This RAM is however shared between the graphics and main system memory. By default 64Mb is allocated to graphics. This is overkill if you don’t plan to run the graphical interface (or rarely) as in the case of a server. To reduce the amount of memory available for graphics to 32MB enter use
sudo raspi-config and see the memory split option under advanced options.
This requires a reboot to take effect, but we will be rebooting later, so there is no need to reboot at this point.
The next step is to give the Raspberry Pi a static IP address. This is a little more complex as it depends upon your own setup and what router you have on how to achieve this.
By default the Raspberry Pi will request a dynamic IP address which is issued by your router as required. This however may change in future which would make it hard to connect to the webserver. Instead we provide it with an address that doesn’t change such as 192.168.1.4.
Note that this address can be used on the local network, but not on the Internet – later you will see how to provide access through your router / firewall from the Internet.
First find out what DHCP address has been allocated by using the ifconfig command – see the extract below
...

eth0      Link encap:Ethernet  HWaddr b8:27:eb:8a:71:a0

          inet addr:192.168.1.110  Bcast:192.168.1.255  Mask:255.255.255.0

...
This is saying that the ethernet port 0 – has an IP address of 192.168.1.110
You will also need to find out what address your router is, using the route command
$ route

Kernel IP routing table

Destination     Gateway         Genmask         Flags Metric Ref    Use Iface

default         192.168.1.1     0.0.0.0         UG    0      0        0 eth0

192.168.1.0     *               255.255.255.0   U     0      0        0 eth0
This shows that the router IP address (Gateway) is 192.168.1.1 and all traffic is sent via that router.
At this point you will also need to check on what address range is being issued by the router for dynamic (DHCP) requests. This depends upon the individual router. In my case I have a Belkin Wireless Router which can be reached by pointing a web browser to the IP address of the router 192.168.1.1
The LAN settings are shown below:
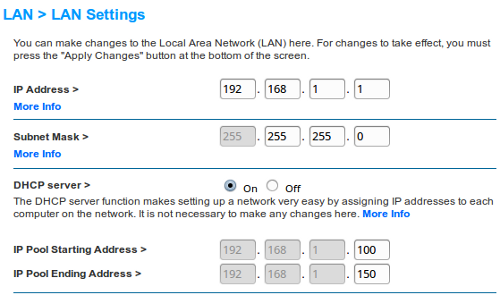
In this case the local network has valid addresses from 192.168.1.1 to 192.168.1.254. The router is at address 192.168.1.1 and any DHCP requests will be given entries between 192.168.1.100 and 192.168.1.150 (you can change the range of the DHCP addresses if required). I have used 192.168.1.4 for this server.
To change to static IP address you should look in the /etc/dhcpcd.conf file which allows you to specify static addressing.
sudo nano /etc/dhcpcd.confadd the following entries to the bottom of the file
interface eth0

inform 192.168.1.4

static routers=192.168.1.1

static domain_search=

static domain_name_servers=8.8.8.8 4.4.4.4
Note that for the domain_name_servers entry I have used the Google DNS servers, but you may prefer to use your local router or ISP DNS servers.
Whilst you can dynamically reload the network interface I suggest a reboot at this stage to make sure that the configuration is correct.
sudo reboot
After logging in check using ifconfig to confirm that we have a static ip address
...

eth0      Link encap:Ethernet  HWaddr b8:27:eb:8a:71:a0

          inet addr:192.168.1.4  Bcast:192.168.1.255  Mask:255.255.255.0

...SSH (Secure Shell) is a network protocol that allows you to login and control the computer through the command line remotely. As the name suggests it is secure as it encrypts communication across the network (so that others cannot see your password etc). It also has some great features such as tunnelling, which we won’t go into here.
The ssh server is installed on the default image but needs to be enabled so that it starts at boot time. You can enable/disable the ssh server using sudo raspi-config.
You can now connect to the Raspberry pi remotely (on the same network) via ssh.
If you have another linux computer on the network then from a terminal run
ssh 192.168.1.4
which will login with the same username. If you want to use a different username then prefix that before the ip address with an @ sign.
eg
ssh user1@192.168.1.4
SSH is also included on a MAC so you can use the same commands as above.
If you want to connect from Windows then there are several options, but I suggest the open source software Putty.
Next we are going to configure the router to allow ssh logins and web traffic through its firewall to the Raspberry Pi.
You did remember to change the default password for the pi username didn’t you! If you haven’t already changed the default password then do it now otherwise anyone will be able to login to your Raspberry Pi.
As a home user the ip address used on your local network is a private address range that will not work over the Internet. Instead your ISP will provide a single dynamic IP address which is used by the router. To allow traffic to flow from the Internet to your Raspberry Pi needs the IP address of the Pi to be made to look as though it is from the router. This is a process called Network Address Translation (NAT).
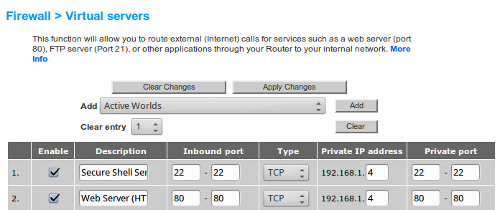
The ports that need to be allowed through are port 80 (http) and if you would like to be able to login to the computer from the Internet then port 22 (ssh).
To do this you will need to consult the instructions on your router. In the case of my Belkin router this is through the Firewall > Virtual servers settings (see below), but Netgear this is Advanced > Security > IP Forwarding.
The final stage is to have a DNS entry point at your router’s IP address. Unless you have a fixed IP address from your provider then your IP address can change. I use DuckDNS.
The Apache webserver is available to download from the Debian repositories. This can be done through the apt tools.
First have you refreshed the software repositories? If not run sudo apt update to make sure that it knows about any new packages / versions available.
Apache is installed by entering the following
sudo apt install apache2
In the past the Mysql database server was used by most distributions. Since mysql is now managed by Oracle many distributions (including Debian on which Raspbian is based) have now moved to the similar Maria database software. Maria can be isntalled from the software repositories using:
sudo apt install mariadb-server
During the install there is a prompt request for a password.
The password is for the mysql root user and it is strongly recommended you choose an appropraite password.
In the past Perl was frequently used for web programming, but since then PHP gained popularity for being easier to integrate into web pages. Python is also gaining popularity for web programming. For Python there are two different versions, the old Python (which is what runs when you just type python) and the new (recommended) Python which is version 3 (run by entering python3).
You can install all these different programming languages and then just pick and choose based on your particular needs.
The good new is that Perl (version 5) and Python (version 2.7 and 3) are installed as part of the operating system so you will just need to install PHP.
The following commands will install the current version of PHP (at time of writing version 7.0) and the mysql libraries to allow PHP to access the maria database. Note this is not a typo putting mysql instead of maria, the PHP libraries are written for mysql, but work the same with MariaDB.
sudo apt-get install php php-mysqlOnce the setup is complete you can access the web page by pointing your browser to the router IP address or DNS entry.
You should get a page back stating that it works, but that there is no content loaded.
To test that the webserver and PHP are working correctly then delete the file /var/www/html/index.html and create a file /var/www/html/index.php with the contents of this page.
The file will need to have appropriate permissions; in particular for a php executable file then it needs to have read and execute permissions.
Assuming you also want others in the group to be able to edit the files then for a regular file use:
sudo chmod 664 filename
for an executable file (eg. .php) use:
sudo chmod 775 filename
Note that the filename of the link ends in .txt to prevent my webserver from running this, you should have the file ending with .php so that the file is run as a PHP script.
This guide has been updated for Raspbian Stretch (available from August 2017). If you are using a different version then the install steps may be different. For example with Debian Wheezy the html director was /var/www instead of /var/www/html

