- Home
- Learn Linux
- Learn Electronics
- Raspberry Pi
- Programming
- Projects
- LPI certification
- News & Reviews

Google Ads
This provides details of how to configure a computer as a webserver using free Linux software. It is termed a LAMP server which is one of the most common configuration for webservers which standard for:
Linux – operating system
Apache – webserver (http) software
Mysql – database server
PHP or Perl – programming languages
For this tutorial the configuration is done at the command line. This may not be quite as easy as clicking a few icons, but it has many advantages, including the ability to remotely manage and install the server. It also means that the computer can spend more of it’s time server up web pages and less processor time drawing a GUI, which is after all the whole point of a webserver.
The specification of the computer depends upon the complexity of any dynamic code and the number of visitors expected. For a personal blog or similar then this will not need to be a particularly powerful computer and the use of Linux can give an otherwise old computer a new life.
I have chosen Xubuntu as it is a lightweight version of Linux. Whilst for a real server it will usually run without a monitor attached, it can be useful to have a GUI environment on occasions (eg it is easier to perform complex partitioning using the GUI gparted than it is doing the same thing using only text based tools).
Therefore I used the xubuntu desktop version, although the alternative version could have been used if a graphic display was not required. The process is the same for Ubuntu or for any of the other Ubuntu variants.
First install Xubuntu – in my case using a USB boot disk, although you can use the CD image if preferred.
At the partitioning stage you will normally want to select “Replace existing operating system with Xubuntu”, or you could create a more custom partition setup using “Something else” which uses the manual configuration, but that is perhaps more for the advanced administrator.
As we are going to be doing this through the command line it is useful to understand a little about the shell. Although this provides step-by-step instructions if you haven’t used the command line previously I suggest you read the basic shell reference guide, and then return to this point.
Throughout the install you will see many commands prefixed with sudo. The sudo command allows the user to issue a command as the superuser (or in certain circumstances as another user). Without using the sudo command many of the commands would fail stating insufficient permissions. This is a security feature that protects the system from other users, but also limits the amount of damage that a user can do by mistake (although if prefixed with the sudo command it will not help against accidents).
Part of the configuration involves editing a text file. There are two command line text editors installed by default. The nano editor is the easiest for new users (so that’s what I’ve referred to below), but I do recommend learning the vi (vim) text editor as it is useful tool that is installed on all linux systems. If you are familiar with vi then replace nano with vi for the rest of this guide.
The first step is to give the system an static IP address. This is a little more complex as it depends upon your own setup and what router you have on how to achieve this.
By default the computer will request a dynamic IP address which is issued by your router as required. This however may change in future which would make it hard to connect to the webserver. Instead we provide it with an address that doesn’t change such as 192.168.1.4.
Note that this address can be used on the local network, but not on the Internet – later we’ll look at providing access through your router / firewall from the Internet.
First find out what DHCP address has been allocated by using the ifconfig command – see the extract below
...

eth0      Link encap:Ethernet  HWaddr 00:1c:25:4e:12:95

          inet addr:192.168.1.110  Bcast:192.168.1.255  Mask:255.255.255.0

...
This is saying that the ethernet port 0 – has an IP address of 192.168.1.110
You will also need to find out what address your router is, using the route command
$ route


Kernel IP routing table

Destination     Gateway         Genmask         Flags Metric Ref    Use Iface

default         192.168.1.1     0.0.0.0         UG    0      0        0 eth0

192.168.1.0     *               255.255.255.0   U     0      0        0 eth0
This shows that the router IP address (Gateway) is 192.168.1.1 and all traffic is sent via that router.
At this point you will also need to check on what address range is being issued by the router. This depends upon the individual router. In my case I have a Belkin Wireless Router which can be reached by pointing a web browser to the IP address of the router 192.168.1.1
The LAN settings are shown below:
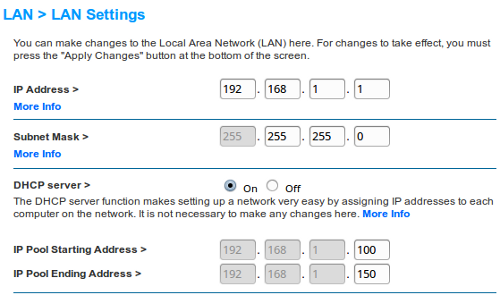
In this case the local network has valid addresses from 192.168.1.1 to 192.168.1.254. The router is at address 192.168.1.1 and any DHCP requests will be given entries between 192.168.1.100 and 192.168.1.150 (you can change the range of the DHCP addresses if required). I have used 192.168.1.4 for this server.
To change to static IP address
cd /etc/networks

sudo nano interfaces
Change the first line to
auto lo eth0
This sets the eth0 interface to come up during startup
Add the following to the bottom of the file
iface eth0 inet static

address 192.168.1.4

netmask 255.255.255.0

gateway 192.168.1.1

dns-nameservers 192.168.1.1
This sets the static ip address details for the interface.
The final entry points the DNS entries at the local router. Alternatively you could point directly at your ISPs DNS servers rather.
Whilst you can dynamically reload the network interface (ifdown eth0) I suggest a reboot at this stage to make sure that the configuration is correct.
sudo reboot
After logging in check using ifconfig to confirm that we have a static ip address
...

eth0      Link encap:Ethernet  HWaddr b8:27:eb:8a:71:a0

          inet addr:192.168.1.4  Bcast:192.168.1.255  Mask:255.255.255.0

...SSH (Secure Shell) is a network protocol that allows you to login and control the computer through the command line remotely. As the name suggests it is secure as it encrypts communication across the network (so that others cannot see your password etc). It also has some great features such as tunnelling, which we won’t go into here.
Install the ssh server by using the following command
sudo apt-get install openssh-server
This will install the SSH server from the repositories. The appropriate files will be downloaded over the Internt and then installed, so an Internet connection is required at this point.
You can now connect to the computer remotely (on the same network) via ssh.
If you have another linux computer on the network then from a terminal run
ssh 192.168.1.4
which will login with the same username. If you want to use a different username then prefix that before the ip address with an @ sign.
eg
ssh user1@192.168.1.4
I believe that ssh is also installed on a MAC so you can use the same commands as above.
If you want to connect from Windows then there are several options, but I suggest the open source software Putty.
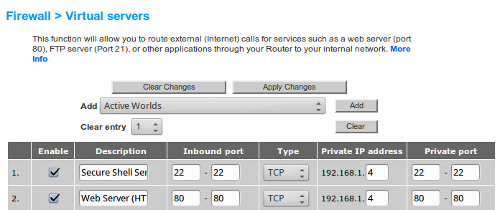
Next we are going to configure the router to allow ssh logins and web traffics through its firewall to the Raspberry Pi.
You did remember to change the default password for the pi username didn’t you! If you haven’t already changed the default password then do it now otherwise anyone will be able to login to your Raspberry Pi.
As a home user the ip address used on your local network is a private address range that will not work over the Internet. Instead your ISP will provide a single dynamic IP address which is used by the router. To allow traffic to flow from the Internet to your Raspberry Pi needs the IP address of the Pi to be made to look as though it is from the router. This is a process called Network Address Translation (NAT).
The ports that need to be allowed through are port 80 (http) and if you would like to be able to login to the computer from the Internet then port 22 (ssh).
To do this you will need to consult the instructions on your router. In the case of my Belkin router this is through the Firewall > Virtual servers settings.
The final stage is to have a DNS entry point at your router’s IP address. In my case I have cable Internet through Virgin Media. Although it does have a dyanmic IP address the address does not normally change. I have a static DNS entry on a Internet DNS server. The entry only needs to be changed about once every year or when Virgin Media perform significance maintenance on the Internet connection.
If you have a dynamic IP address that changes on a more recent basis then you will need to register for a dyanmic dns service.
The Apache webserver is available to download from the Ubuntu repositories. This can be done by entering the following
sudo apt-get install apache2
The mysql database server is also available through the Debian repositories and installed as
sudo apt-get install mysql-server
During the install there is a prompt request for a password.
The password is for the mysql root user.
Perl is installed as part of the operating system so I will just be adding PHP.
The following commands will install PHP version 5 and the mysql libraries to allow PHP to access the mysql database.
sudo apt-get install php5

sudo apt-get install php5-mysql
You may also like to install the following which are recommended packages.
php-pear php5-suhosin
So far I have only been installing one package at a time, but you can install multiple packages by adding them as further options on the command line.
sudo apt-get install php-pear php5-suhosin
Once the setup is complete you can access the web page by pointing your browser to the router IP address or DNS entry.
You should get a page back stating that it works, but that there is no content loaded.
To test that the webserver and PHP are working correctly then delete the file /var/www/index.html and create a file /var/www/index.php with the contents of this page.
Note that the filename of the link ends in .txt to prevent my webserver from running this, you should have the file ending with .php so that the file is run as a PHP script.

