- Home
- Learn Linux
- Learn Electronics
- Raspberry Pi
- Programming
- Projects
- LPI certification
- News & Reviews

Google Ads
Since this post was written I've now created a new version of the Christmas House circuit based around a printed circuit board. For full details then see: Raspberry Pi Christmas House Electronics Project.
This year I've been creating a 3D model of a building for an outdoor model railway. Technically it's a building for a weigh bridge rather than a house, but I've given it a Santa's Grotto make-over for Christmas and so Christmas House sounds better.
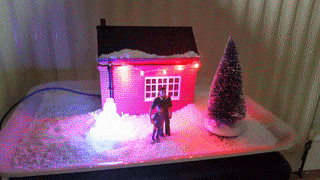
I've added a 3D printed snowman also designed in TinkerCAD.
Initially I added a smoke generator for the chimney, a white LED for a lamp and a red LED for the glow from the fireplace. To give it it's Christmas theme I've also added a NeoPixel light inside the snowman and string of LEDs as Christmas lights. I have disabled the smoke as that was more appropriate when it's outdoor with the railway rather than the indoor Christmas display.
The circuit diagram is shown below (click on the image for a large version).

The circuit is designed for a Pi Zero with a custom HAT, which would fit better inside the building, but for the initial version this has been connected to a Raspberry Pi 2 with a half-size breadboard, which just fits inside the 3D printed building.

Although built on a bread-board wires need to be soldered to the LEDs.
To control the NeoPixel (RGB colour changing LED) then a library will need to be installed first. This is explained in the following worksheet:
Worksheet for configuring NeoPixels on a Raspberry Pi
The following code should be added to a file called /home/pi/christmas-house/display.py
#!/usr/bin/python3
from gpiozero import LED
from neopixel import *
import time

# config details for neopixel
LEDCOUNT = 1
GPIOPIN = 18
FREQ = 800000
DMA = 5
INVERT = True
BRIGHTNESS = 255

FIRE_PIN = 24
LAMP_PIN = 25
GREEN_PIN = 17
RED_PIN = 27

fire_led = LED(FIRE_PIN)
lamp_led = LED(LAMP_PIN)
green_led = LED(GREEN_PIN)
red_led = LED(RED_PIN)

timer = 0

# red / green chaser mode - toggle between red and green
# if 1 = red led on, if 0 then green led on
red_green = 1

rgb_colours = [Color(248,12,18), Color (255,51,17), Color(255,102,68), \
               Color(254,174,45), Color(208,195,16), Color(105,208,37), \
               Color(18,189,185), Color(68,68,221), Color(59,12,189)]
seq_number = 0

# Create neopixel object
strip = Adafruit_NeoPixel(LEDCOUNT, GPIOPIN, FREQ, DMA, INVERT, BRIGHTNESS)
strip.begin()
strip.setPixelColor(0, rgb_colours[0])
strip.show()

def led_change():
    global timer, red_green, seq_number
    timer += 1
    # if number is divisble by 6 then flicker red led
    if (timer % 6 == 0):
        fire_led.off()
    else:
        fire_led.on()

    # toggle red green leds
    if (timer % 10 == 0):
        red_green = 1 - red_green
        if (red_green == 1):
            red_led.on()
            green_led.off()
        else:
            red_led.off()
            green_led.on()

    # Color change snowman
    if (timer % 12 == 0):
        seq_number += 1
        if (seq_number >= len(rgb_colours)):
            seq_number = 0
        strip.setPixelColor(0, rgb_colours[seq_number])
        strip.show()

lamp_led.on()

while True:
    led_change()
    time.sleep(0.25)
It can then be run using:
sudo python3 /home/pi/christmas-house/display.py
The code works by having a single loop which runs and then pauses for 1/4 of a second. During the led_change function the timer is incremented and if the value of the timer reaches the appropriate factor then it changes which LEDs are on etc.
The % provides the modulo value, which is the remainder after dividing the number of the left by the number on the right.
For example
timer % 12
Will be exactly zero whenever the value of the timer is a multiple of 12. As the timer value incrementes every quarter of a second this means it updates every 3 seconds.
To have the code run automatically when the computer boots then create the following file (you will need to sudo to root to have appropriate permissions) as /etc/systemd/system/house.service
[Unit]
Description=House

[Service]
ExecStart=/usr/bin/python3 /home/pi/christmas-house/display.py
User=root

[Install]
WantedBy=multi-user.target
Give it permission to run:
sudo chmod +x /etc/systemd/system/house.service
Then set it to start automatically using:
sudo systemctl enable house.service
I've also created a YouTube video introducing the project. Please subscribe to penguintutor on YouTube.
Details of how I made the 3D models in TinkerCAD are available below:

