- Home
- Learn Linux
- Learn Electronics
- Raspberry Pi
- Programming
- Projects
- LPI certification
- News & Reviews

Google Ads
One of the things I've been doing recently is a school project with my children using the Raspberry Pi. My daughter has written the program in Scratch, but I needed to find a way to get it to autoplay. This should have been fairly straight forward using an appropriate autostart file and Scratch presentation mode, except for the fact it was accessing the GPIO port. When you use Scratch in conjunction with another programming language (in this case it's Python to interface with the GPIO) then it provides a pop-up informing the user: "Remote sensor connections enabled". Easy enough to click through if you have a mouse and monitor attached, but this project was designed to not use the mouse and even the monitor is optional. These are the steps required to allow Scratch to communicate with the GPIO, for Scratch to launch into autostart "presentation mode" and so that this all happens without any human interaction required.
Although Scratch is not aware of the GPIO ports on the Rasbperry Pi, it does have the ability to communicate with other programs. Therefore it is possible to have a python program that runs in the background that acts as an interface to the GPIO ports. There are a couple of sources that can help in this regard.
The Scratch Wiki has details of how Scratch can communicate with a Python application:
Scratch Wiki: Communicating between Scratch and Python.
There is a choice of two projects that provide the ability for python to talk to the Raspbery Pi GPIO. RPI:GPIO or WiringPi.
Fortunately Simplesi has already done the hard work and provided step-by-step instructions on getting this installed, which is the one I suggest using:
Scratch GPIO install instructions.
I needed Scratch to run in presentation mode which is their name for running the application in fullscreen mode. This achieved by using the presentation option on the scratch command, but we also need to start the scratch handler first.
If you are using the CympleCy we first need to run the following:
sudo ps aux | grep 'python.*scratch_gpio_handler.py' | grep -v grep | awk '{print $2}' | xargs sudo kill -9


sudo python /home/pi/simplesi_scratch_handler/scratch_gpio_handler.py &
The first line stops an existing handler if currently running, the second starts it up again. If running on startup (I'll come to that later) then the first line isn't required.
Then Scratch is started in presentation mode using the following:
scratch presentation /home/pi/Documents/Scratch/scratchApp.sb
Note that the default directory that Scratch uses is called "Scratch Projects". Unfortunately the space make it complicated to add this to a script (it's not as simple as just escaping the space as there are different places that it needs to be escaped in different ways"), so I instead put it into a different directory without a space in the name.
To make this easier this can be put into a single script
First change to directory /home/pi/Scratch
cd ~/Scratch
(note I have used ~ which is a shortcut to your home directory)
Then create a file called ScratchApp.sh with the following content (leafpad ScratchApp.sh)
#!/bin/bash


sudo ps aux | grep 'python.*scratch_gpio_handler.py' | grep -v grep | awk '{print $2}' | xargs sudo kill -9


sudo python /home/pi/simplesi_scratch_handler/scratch_gpio_handler.py &


scratch presentation /home/pi/Scratch/scratchApp.sb
Give it executable permission
chmod +x ScratchApp.sh
Then create an autostart script
Create the directory (if it doesn't already exist)
mkdir ~/.config/autostart
and change into that directory
cd ~/.config/autostart
Add a file ending with .desktop (eg scratchApp.desktop) with the following
[Desktop Entry]


Encoding=UTF-8


Version=1.0


Type=Application


Exec=/home/pi/Scratch/scratchApp.sh


Icon=scratch


Terminal=false


Name=Program name


Comment=About the program


Categories=Application;Education;Development;


MimeType=application/x-scratch-project
This will then run whenever you login (ie. assuming GUI autostart and auto-login is enabled then whenever you boot the Raspberry Pi).
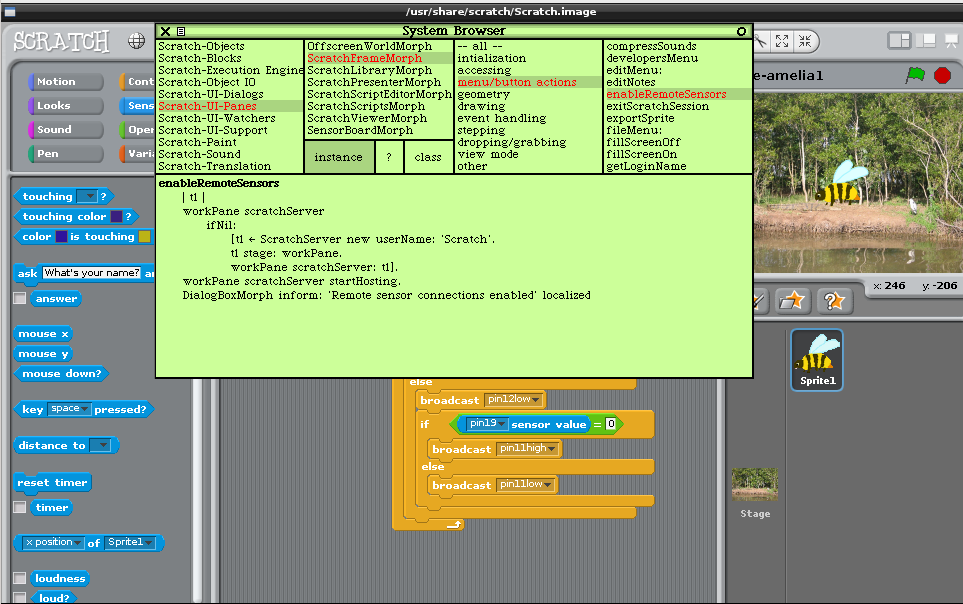
We now have the program working in presentation mode, but as mentioned earlier there is a pop-up message "Remote sensor connections enabled" that stops it running until you have clicked OK. This is something that needs to be turned off within the Scratch application, which is one of the hidden settings within Scratch.
After launching Scratch shift left-click on the R in the Scratch logo (top left) and choose "turn fill screen off". Click on the white area to the right or bottom of the screen and choose "Open" and "Browser". Navigate to the section Scratch-UI-Panes -> ScratchFrameMorph -> menu/button actions -> enableRemoteSensors and remove the line:
Dialogboxmorph Inform: 'Remote Sensor Connections Enabled' Localized
This can be seen in the screen shot below.
Then click with the centre mouse button (or Ctrl and left button) and choose Accept (s).
You can now remove the white space in Scratch by shift left click on the R in Scratch logo and choose Turn Fill screen on. Finally shift left click on the logo again and choose "save image for end-user"

