- Home
- Learn Linux
- Learn Electronics
- Raspberry Pi
- Programming
- Projects
- LPI certification
- News & Reviews

Google Ads
Pygame Zero is an easy way to get started in game programming. It used Python Pygame, but makes getting started easier by reducing the amount of code required.
I've previously created a tutorial getting started with Pygame Zero programming.
One feature that is missing from Pygame Zero is support for joysticks or gamepads. It is listed as a feature they want to add in future but it hasn't been implemented yet (see Pgzero issue 70).
In the meantime here is a workaround that I have found useful for playing games using a gamepad, joystick other other game controller. It works by having the gamepad emulate the keyboard. The example I show here is for Linux (including the Raspberry Pi), but there alternatives for other operating systems such as Antimicro for Windows and enjoyable for MacOS. The software used here is for Linux and is called QJoyPad
You can watch a video of how to configure QJoyPad below, or keep reading for more information.
First install qjoypad. This can be installed from the command line using:
sudo apt install qjoypad
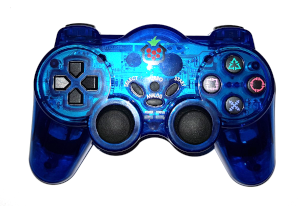
You then need to launch QJoyPad from the games menu. This adds a small icon on the right of the task bar. You then need to configure the keys. Click on the gamepad and it will detect any connected gamepads or joysticks and allow you to configure them. In the screenshot below this is a Raspberry Pi Wireless USB Game controller from ThePiHut. If your gamepad / joystick is not shown then you need to make sure it is supported by the operating system and that it's connected. Most USB game controllers should work. In my case a quick look at dmesg shows that it is recognised as a X-Box controller
[1278236.150562] usb 1-1.4: new full-speed USB device number 5 using dwc_otg
[1278236.290054] usb 1-1.4: New USB device found, idVendor=045e, idProduct=028e, bcdDevice= 1.10
[1278236.290080] usb 1-1.4: New USB device strings: Mfr=1, Product=2, SerialNumber=0
[1278236.290093] usb 1-1.4: Product: XBOX 360 For Windows
[1278236.290104] usb 1-1.4: Manufacturer: ShanWan
[1278236.371547] input: Microsoft X-Box 360 pad as /devices/platform/soc/3f980000.usb/usb1/1-1/1-1.4/1-1.4:1.0/input/input7
[1278236.372634] usbcore: registered new interface driver xpad
Clicking on the controller icon gives the option to configure each of the buttons as shown in the screenshot below. The number of buttons and controls shown will depend upon the number of buttons and joysticks your game controller has.
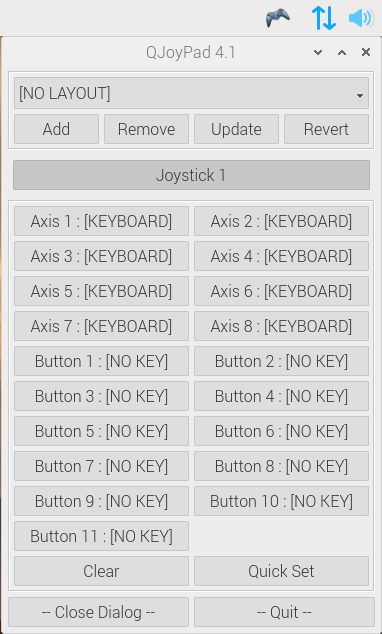
You can then configure each of the controls by clicking on the relevant item. You can see which each axis or button is on the controller by pressing those controls.
The table below shows some common buttons:
| QJoyPad reference | Raspberry Pi Wireless USB | Raspberry Pi Wired Gamepad | XBox wired controller | PS4 controller* |
|---|---|---|---|---|
 |  |  |  | |
| Axis 1: | Left analog joystick - left right | Direction buttons - left right | Left analog joystick - left right | Left analog joystick - left right |
| Axis 2: | Left analog joystick - up down | Direction buttons - up down | Left analog joystick - up down | Left analog joystick - up down |
| Axis 3: | L2 button | Left trigger | L2 trigger | |
| Axis 4: | Right analog joystick - left right | Right analog joystick - left right | Right analog joystick - left right | |
| Axis 5: | Right analog joystick - up down | Right analog joystick - up down | Right analog joystick - up down | |
| Axis 6: | R2 button | Right trigger | R2 trigger | |
| Axis 7: | Direction buttons - left right | Direction buttons - left right | Direction buttons - left right | |
| Axis 8: | Direction buttons - up down | Direction buttons - up down | Direction buttons - up down | |
| Button 1: | Blue cross | Blue X | Green A | Blue cross |
| Button 2: | Red circle | Red A | Red B | Red circle |
| Button 3: | Pink square | Yellow B | Blue X | Green triangle |
| Button 4: | Green triangle | Green Y | Yellow Y | Pink square |
| Button 5: | L1 button | Left trigger | Left bumper | L1 button |
| Button 6: | R1 button | Right trigger | Right bumper | R1 button |
| Button 7: | Select | View button | L2 Button | |
| Button 8: | Start | Menu button | R2 Button | |
| Button 9: | Analog button | Select | XBox button | Share |
| Button 10: | Press left joystick | Start | Press left joystick | Options |
| Button 11: | Press right joystick | Press right joystick | PS4 | |
| Button 12: | Press left joystick | |||
| Button 13: | Press right joystick |
*PS4 was tested cabled via a USB cable
You can then map these to the appropriate buttons for your game. The following are the ones I have mapped for the USB wireless controller which is similar to the keys used in the Picade Arcade Machine.
Axis 7 and 8 - Direction Arrows
Button 1 - Z
Button 2 - Left Alt
Button 3 - Left Ctrl
Button 4 - Left Shift
Button 5 - X
Button 6 - Space
Button 7 - Return
Button 8 - O
Button 9 - Escape
Button 10 - h
Button 11 - l
The other buttons are not mapped.
You can test the keys using testkeys.py which is a simple Pygame Zero program that I created.
WIDTH = 800
HEIGHT = 600

last_key_type = 0
last_key_press = ""

def draw():
    screen.clear()
    screen.draw.text("Last key press: "+last_key_press+" key: "+str(last_key_type), (20, 100))

def on_key_down(key, mod, unicode):
    global last_key_press, last_key_type
    # Double press q to quit
    if (last_key_type == keys.Q and key == keys.Q):
        quit()
    last_key_type = key
    last_key_press = unicode
You can map the keys differently depending upon the keys required by your particular game or your preference for the particular keys. Note that the analog joysticks will be mapped to key presses rather than having an accurate position of how far over the joystick is held.
When you are happy with your layout you can save it using the Add button and giving it an appropriate name. You can then close the dialog and QJoyPad will continue to run in the background.
The config is saved in ~/.qjoypad3 with the layout name followed by .lyt.
You can see the Wireless controller in use with the SnowPi badge with built-in game.

