- Home
- Learn Linux
- Learn Electronics
- Raspberry Pi
- Programming
- Projects
- LPI certification
- News & Reviews

Google Ads
RFID (Radio Frequency Identification) and NFC (Near Field Communication) provide the ability for devices to talk to each other by touching them together. This could be between two smart devices or between a smart device to a simple tag embedded into a card or sticker.
In my case my requirements were quite basic as I just wanted to be able to read the unique ID on a RFID tag. I then store all the information on the Raspberry Pi rather than trying to read and write additional information onto the RFID tag.

There are a few different devices that are compatible with the Raspberry Pi which vary greatly in cost. As my needs were fairly simple I went for an inexpensive RFID reader/writer based around the RC522 which is available for a few pounds. I bought mine through RyanTeck, it's also available through other suppliers. This is often advertised as being for the Arduino, but it just uses standard SPI so can be connected directly to the Raspberry Pi SPI connection on the GPIO port.
The RFID module was supplied with header pins, but these had to be soldered on. I used header pins with a 90° bend so that the wires do not protrude upwards. I then used female-to-female jumper leads to connect from the RFID module to the Raspberry Pi GPIO connector.
The diagram below shows the connections between the RFID connections and the GPIO ports on the Raspberry Pi.
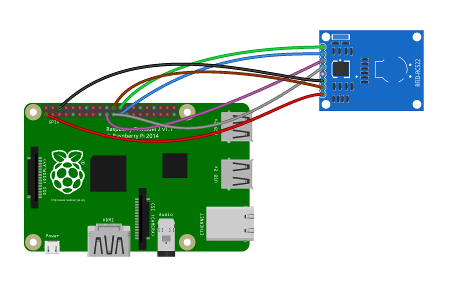
The connections are:
| RFID | Raspberry Pi | GPIO phys pin | Wire colour |
|---|---|---|---|
| SDA/SS* | CE0 | 24 | Green |
| SCK | SCLK | 23 | Blue |
| MOSI | SPI MOSI | 19 | Purple |
| MISO | SPI MISO | 21 | Grey |
| IRQ | N/C | N/C | N/A |
| Gnd | Gnd | 6 | Black |
| RST | GPIO 25 | 22 | Brown |
| 3.3V | 3.3V | 1 | Red |
* The pin is labelled as SDA which relates to it's alternative use if using I2C, but is being used as SPI SS (slave select).
The colours shown relate to the multi-way jumper cables I had available, any colour can be used instead.
There are a few configuration changes that are needed to allow the Raspberry Pi to communicate with the RFID module. These relate to enabling the SPI drivers and downloading the Python code.
First go into the Raspberry Pi configuration application and from the Interfaces tab enable SPI.
(Also available using sudo raspi-config to configure in a terminal)
Say no to rebooting, as we need to make further changes that also need a reboot.
Edit /boot/config.txt using your favourite editor eg.:
sudo nano /boot/config.txt
Add the following entry to the end of the file:
dtoverlay=spi-bcm2708
Install the SPI-Py library
git clone https://github.com/lthiery/SPI-Py
cd SPI-Py
sudo python3 setup.py install
Download the pi-rc522 files using
cd ~
git clone https://github.com/ondryaso/pi-rc522.gitIf you haven't rebooted since adding the entry to config.txt then you should now reboot the Raspberry Pi.
The code below shows the steps required to check for a card and read the UID. The UID is made up of a list of 4 values which are printed on a single line.
#!/usr/bin/python3
import sys
sys.path.insert(0, "/home/pi/pi-rc522/ChipReader")
import RFID
import signal
import time

rdr = RFID.RFID()
util = rdr.util()
util.debug = False

while True:
    #Request tag
    (error, data) = rdr.request()
    if not error:
        print ("\nDetected")

        (error, uid) = rdr.anticoll()
        if not error:
            #Print UID
            print ("Card read UID: "+str(uid[0])+","+str(uid[1])+","+str(uid[2])+","+str(uid[3]))

            time.sleep(1)
This can be used with rfid cards, key-ring style tags, and NFC stickers.

