- Home
- Learn Linux
- Learn Electronics
- Raspberry Pi
- Programming
- Projects
- LPI certification
- News & Reviews

Google Ads
I've been looking for a project that is suitable for school children but relates to a real world solution. This project is based on an idea related to my work looking after computer data centres located around the world. One of the things we need to track is the environmental condition in the data centre and specifically the temperature and humidity. We have a rather expensive system that monitors this already, along with a lot of other things related to the infrastructure. This just focuses on the temperature and humidity and is designed to be an inexpensive project that can be replicated and improved at home or school.
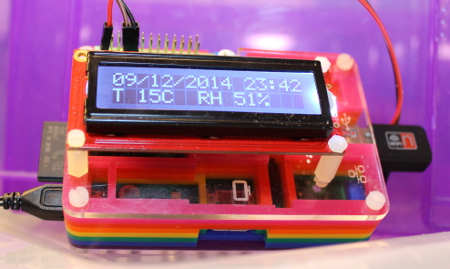
The design for this is to provide a Raspberry Pi based temperature and humidity monitor that regularly records and logs the temperature and humidity. The monitor will include and LCD display showing the most recent reading.
To reduce the cost and keep the project simple an inexpensive temperature and humidity sensor will be used. This would not be accurate enough for use for data centre managements, but would still provide an approximate overview of the environmental condition sufficient for monitoring an indvidual cabinet or any of the other example uses mentioned later.
This has been implemented using the most basic model of Raspberry Pi - Model A. This does not include any networking built-in, but works well with a USB wifi dongle for wireless communications. A model B could be used in the same with with the addition of being able to connect to a wired network. A model A+/B+ would allow more flexibility due to the additional GPIO ports.
The temperature sensor I have used it a DHT11. It's an inexpensive sensor that is commonly available and is easy to interface to. The sensor is not particularly accurate and there is a more accurate sensor DHT22, although I have not investigated the DHT22 further.
The sensor is fairly easy to connect to the Raspberry Pi. There are three wires needed, two of which are for the power supply and a pull-up resistor on the data connection. To add the resistor I have soldered the resistor between the data and Vcc lines by cutting the insulation from the wires and then encasing them in heat-shrink sleeving.
The DHT11 is connected as follows (pin numbers on the DHT11 from left to right with the pins at the bottom).
| DHT11 pin | Raspberry Pi GPIO pin | Comment |
|---|---|---|
| 1 | 1 | Vcc |
| 1 | 10k resistor | |
| 2 | 7 | Data |
| 2 | 10k resistor | |
| 3 | N/A | Do not connect |
| 4 | 9 | Gnd |
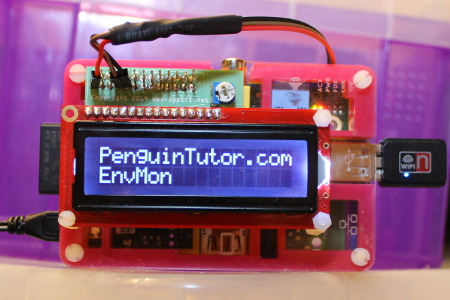
The LCD display is based on a Hitachi HD44780 compatible display. It can be driven directly from the GPIO port. The only additional component is a variable resistor used for the brightness / contrast. The easiest way of connecting this to the Raspberry Pi is by using a MyPiFi LCD display board. The LCD board includes a large header for the GPIO port which allows the temperature sensor to be connected to unused pins on the GPIO connector.
I mounted the LCD display onto a PiBow case with a bit of modification to the case. The photo below shows a MiPiFi LCD display mounted on a Raspberry Pi model A in a Pimoroni Pibow case.
The software used (including source code) can be downloaded as envmon.tgz. This is a tar archive that should be extracted. It includes a opt directory with the compiled code and python code, an etc directory containing the startup file (init.d) and a src directory with the source code.
The software used to read the temperature and humidy from the DHT11 is based on code in the book Mastering the Raspberry Pi by Warren Gay. I was technical reviewer for the book so was familiar with the code already. The code is written in C, which performs bit bashing to send the query and read the result.
I made some changes to the c source code to log the current reading into a status file and adding it to a log file. The current file is read by the display code to show the readings on the LCD display.
The software provided for the LCD display is in the /opt/envmon directory called displayenvmon.py. This reads the current reading from the file and then sends it to the LCD display.
For more details on how the code writes to the LCD display see: Programming an LCD character display on the Raspberry Pi using Python. The one additional module required is the RPLCD module which supports writing to the LCD display. This can be installed using:
sudo pip install RPLCD
Although there are frequent additions to the log file it does not occupy much disk space. It is however still a good idea to rotate the logs to make them easier to manage. To do this I created a file /etc/logrotate.d/envmon with the following contents.
/var/log/envmon {

  weekly

  compress

}Something I have not yet done is to add a web interface. This could be achieved by using a webserver on the Raspberry Pi, or using a web framework such as bottle python web framework as used in the Energenie home automation project.
For now I will leave this as a task for the reader.
There are many other practical uses for the environment monitor including monitoring of temperature and humidity in a home, outbuilding, greenhouse, or even a museum. Although this has been designed for passive monitoring it would be possible to have this used for actively notifying someone of a temperature change, turning on heating (eg. using Energenie pi-mote on a model A+/B+ - pin / connector changes will be required), or opening a window for more ventilation (eg. greenhouse).
This is an easy to make project that can be used for monitoring temperature and humidity in a home, greenhouse or at work. The sensor used is low cost, but is not particularly accurate, but can be replaced with a better sensor if required.
Please view the copyright information regarding use of the circuits.

