- Home
- Learn Linux
- Learn Electronics
- Raspberry Pi
- Programming
- Projects
- LPI certification
- News & Reviews

Google Ads
Ever wished you could control your home's electronics with a simple script or a command-line interface? Pi-Power is a lightweight, robust software solution designed to bridge the gap between your Raspberry Pi and Energenie remote-controlled mains sockets.
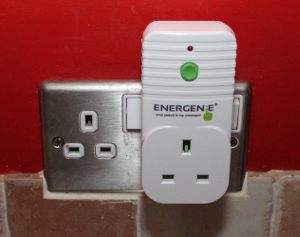
Pi-power is software used to control Energenie remote control sockets. These provide a safe way to turn mains electrical devices on and off, without risk of mains electricity coming into contact with the Raspberry Pi or the user.
Energenie provide a range of sockets that can be controlled by remote control. They also sell a pi-mote which is an add-on board for the Raspberry Pi making it easy to tun the sockets on and off from a Raspberry Pi. The pi-mote plugs into the GPIO connector of the Raspberry Pi and then sends commands using a wireless signal to the power sockets. There are two version of the pi-mote. The initial version (ENER002-2PI) is one-way only and cannot check the status of a socket. The newer model ENER314-RT can be two-way, but that feature is not supported by GPIO Zero and is not used for this. I haven't tested the new version but I expect it will still work, without providing the status update.
I soldered an aerial (consisting of a 135mm long piece of wire) to the pi-mote to increase it's range, but other than that everything else is just a case of creating the software to send the appropriate signals to the Raspberry Pi.
I have written a web interface using Python which allows the sockets to be turned on using a simple remote control interface that can be accessed on a computer or mobile phone on the local wireless network. The web app uses Python GPIO Zero and the Python bottle web framework. The bottle web framework is a simple way to create a web application with a built in web server rather than needing a separate web server such as Apache.
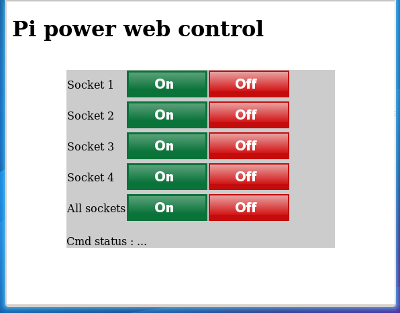
Due to my bad memory of not remembering which number was assigned to which socket I decided to add an updated interface which indicates which device is being controlled. The new version of the software now adds basic template support, allowing for an improved interface and customisation of the display.
Updated install instructions to allow for other usernames rather than pi. Also added the option for a link back to calling website which is useful for integration with other programs (eg. PiQuarium)
The most up-to-date code is available from git:
Git penguintutor pi-power project
Full install instructions are provided in the INSTALL.md file.
Please note that the application was originally created using the pi username. As this is no longer fixed there are some small changes that are needed to the scripts to allow for other users. This is all explained in the INSTALL.md file. An alternative would be to update the install directory, but as that would break existing installs it is an
After starting the web interface (eg. reboot after following the install instructions) you can then connect to interface using the IP address of the Raspberry Pi in a web browser (use ip addr on the Raspberry Pi to find your IP address). It should be possible to connect from a Raspberry Pi, PC or mobile phone and click the appropriate button to turn the socket on and off.
You do need to register the socket with the controller (if not already done using the Energenie demo code). This may vary with different sockets; for the model I use involved starting with the socket in the off position (press green button until the LED is off) then holding down the green on/off button for a few seconds (until the LED starts flashing) and then using the preferred on button on the remote / web page.
Mulitple sockets can be registered against the same switch number on the web interface, but that will mean that all sockets registered to that switch number will turn on and off at the same time.
The software supports templates and themes within those templates. The templates are stored in the views folder.
The default template is the initial template based on previous version of Pi-power. The image template provides a 2x2 image based display.
These can be set using the variable:
custom_template
Within the template is support for themes. These are folders where custom images and CSS can be placed to customize the display. This can be setup using the variable:
custom_theme
The images should be stored in a directory based on the template and theme name. For instance:
custom_template = "image"
custom_theme = "christmas"
The folder name is image_christmas

As well as being able to control the lights from the app it's possible to automatically turn the lights on and off on the Raspberry Pi using crontab. This uses the same web app and a command line tool wget to 'download' the page that requests the appropriate action. I have used this to turn sockets on automatically in the mornings and off in the evenings. You can even add different rules to turn the lights on at different times on weekends vs weekdays or on specific days.
The following shows some simple rules to turn the lights on and off automatically.
# m h  dom mon dow   command

0 8 * * 6-7 wget -O/dev/null http://127.0.0.1/switchon?socket=0

30 15 * * 1-5 wget -O/dev/null http://127.0.0.1/switchon?socket=2

0 23 * * * wget -O/dev/null http://127.0.0.1/switchoff?socket=0

0 9 * * * wget -O/dev/null http://127.0.0.1/switchoff?socket=2
Note that the -O option (capital o) is used to output the download to a file. In this case /dev/null is used which effectively means "save it no-where".
For an example of this in use see Raspberry Pi Energenie pi-mote controlling Christmas Tree lights.
This has also been designed so it can be embedded with other projects, such as the PiQuarium Raspberry Pi touch screen display running in Kiosk mode.
To see future updates please:
Subscribe to the PenguinTutor YouTube Channel
Please view the copyright information regarding use of the circuits.

