- Home
- Learn Linux
- Learn Electronics
- Raspberry Pi
- Programming
- Projects
- LPI certification
- News & Reviews

Google Ads
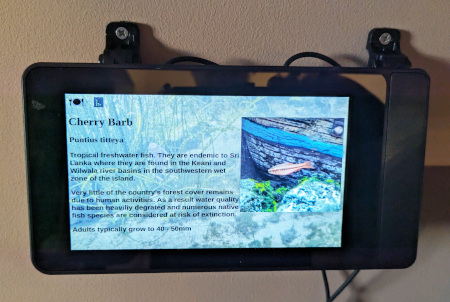
Have you ever visited a public aquarium and admired the sleek, interactive digital displays detailing the aquatic life in each tank? Why not bring that same polished experience right into your own living room? In this project, we are building the "PiQuarium"—a custom Raspberry Pi touch screen dashboard designed specifically for a home tropical fish aquarium. Born out of a need to share fun facts with visitors and keep track of daily family feeding schedules, this build breathes new life into a repurposed Pi display. Beyond just displaying information, this interactive screen ties into existing home automation concepts, laying the groundwork to eventually control your tank's lighting and environmental systems all from one centralized hub!
We've recently introduced some new pets into our home. This time tropical fish. We thought it would be useful to provide some information about the fish for visitors and inspired by a visit to the London Aquarium Sea Life Centre we loved their digital displays. So why not do the same at home?
We also share the feeding and care within the family so we also wanted a way to know if the fish have been fed.
There are obviously many low-tech solutions to these, but I had a Raspberry Pi touch screen that was not doing much for most of the year, so why not use that. The touch screen was being used with my Pi Power home automation, which I thought provide an opportunity to be able to control other aspects of the aquarium including the aquarium light etc.
Whilst I'm at it I decided to use it so I could still control my Christmas lights which is wht the Pi Power project is being used for during 1 month of the year. Although for the write up of this project (in Spring) I won't be including the Christmas Tree light aspect.
A future improvement may be to include monitoring of the temperature in the aquarium to ensure that the tropical fish are keeping warm, but that's not something I've implemented yet.
I wanted to use a touch screen so that it's easy to acknowledge when the fish have been fed, so the Raspberry Pi touch screen with it's 7" display was ideal. I've used a Smarti Pi Touch 2 case, which can be used as a desk stand or in my case to mount it on the wall.
It's likely this could work with most of the versions of the Raspberry Pi (excluding Pi Zero), but I decided to use a Raspberry Pi 3B as it is the oldest that included built-in WiFi. I could have used a Raspberry Pi 4 or a Raspberry Pi 5 but that would have been overkill when I already had a Raspberry Pi 3 I could use.
Setting up the Raspberry Pi touch screen is as simple as connecting the screen to the Raspberry Pi (although ensure you connect the cable correctly) and installing a recent version of the Raspberry Pi OS. As I am using a Raspberry Pi 3 that was Raspberry Pi OS Legacy 32-bit, based around Debian Bullsye with security updates and desktop environment. The screen was automatically detected.
I used a mouse and keyboard during setup, but afterwards this was not required. Alternatively if you enable ssh and VNC it is possible to configure without using a physical keyboard.
The one change I did need to make was because I am wall mounting I needed the screen to be turned by 180 degrees. This can be handled through the Screen configuration app in the Preferences folder. There are other guides with other suggestions, but you will need to check that they also invert the touch aspect, so unless you need to configure it through config.txt it's better to use that configuraton app.

When powered on the display shows the initial Raspberry Pi splash screen upside down, but then rotates the display when it boots into the desktop.
The display is powered using HTML, CSS and Javascript. Also known by the names Web 2.0 or HTML5, although as it's based on standard JavaScript it works with older versions as well. The code is available to download from GitHub Piquarium page.
The file piquarium.html is the main page. It is a simple layout with a dummy loading page, which is then updated using the two javascript files. The piquarium.css file is the CSS (Cascading Style Sheet file) with some formatting. Most of the magic is in the two Javascript files. piquarium.js has the code and data.js is the raw data used to update the display. It is intentionally stored as a JavaScript file so that it doesn't need any special code to read in and interpret the data file. That does however mean that if you create an error in the data file then it will fail to load.
There are two example entries in the data.js file relating to the first two types of fish that we bought for our aquarium. There is a list (array) at the start of the file and then 4 entries for each page with the title, subtitle, image and text.
The data file can be customised with whatever information you would like to display.
The header at the top of the screen shows a red food icon when the fish are due a feed, which changes to black when acknowledged by the user. There is also a link to Pi-Power which can be used for automation, for example if you wanted to be able to control the light, filter and a bubble stone. These can also be scheduled automatically by using crontab.
The PiQuarium files can be run without needing a web-server. They can be accessed localy using the file:// prefix. However, a down side of doing that is that you cannot link to the files from another page, which makes integration with other tools (such as pi-power) difficult. You may therefore prefer to install this into a web server, or serve the files using the built-in pi-power bottle web server.
Setting up a web server is outside of the scope of these instructions. If using with Pi-power then the easiest is to copy these files into the pi-power public directory. Note however that this makes the files available publically on your local network.
Kiosk mode allows you to setup a browser in full screen so that the rest of the operating system is hidden. As the display will be in a trusted location (my home) there is no need to perform the full hardening, but it provides a convenient way to view the information.
Before using kiosk mode it is recommended that you setup ssh as that will allow you access to the Raspberry Pi for maintenance or to upload new images etc You should also set the Raspberry Pi to auto-login to the desktop.
If using a Raspberry Pi 4 or later then you are likely running Wayland so can use wtype and the wayfire config file.
Edit the file .config/wayfire.ini
Update the autostart section to add the following entries to the [autostart] section..
chromium = chromium-browser http://127.0.0.1/public/piquarium.html --kiosk --noerrdialogs --disable-infobars --no-first-run --ozone-platform=wayland --enable-features=OverlayScrollbar --start-maximized

switchtab = bash ~/switchtab.sh

screensaver = false

dpms = false
For more details see Raspberry Pi guide to kiosk mode
If you are running and older version of the Raspberry Pi OS (as I am having a Raspberry Pi 3) then you will need to configure a kiosk script instead.
sudo apt install unclutterCreate a new script called kiosk.sh with the following
#!/bin/bash

xset s noblank

xset s off

xset -dpms


unclutter -idle 0.5 -root &


sed -i 's/"exited_cleanly":false/"exited_cleanly":true/' /home/$USER/.config/chromium/Default/Preferences

sed -i 's/"exit_type":"Crashed"/"exit_type":"Normal"/' /home/$USER/.config/chromium/Default/Preferences


/usr/bin/chromium-browser --noerrdialogs --disable-infobars --kiosk http://127.0.0.1/public/piquarium.html &
Make it executable with:
chmod +x kiosk.shTo make it start automatically into console mode create a file ~/.config/autostart/kiosk.desktop with the following.
[Desktop Entry]

Version=1.0

Name=Kiosk mode

GenericName=Web Browser

Comment=Run in kiosk mode

Exec=/home/pi/kiosk.sh

Terminal=false

X-MultipleArgs=false

Type=Application

Icon=chromium-browser

Categories=Network;WebBrowser;

MimeType=text/html;text/xml;application/xhtml_xml;x-scheme-handler/http;x-scheme-handler/https;

StartupNotify=true

Actions=NewWindow;Incognito;TempProfile;

X-AppInstall-Package=chromium-browser
Then reboot to start the Raspberry Pi in Kiosk mode
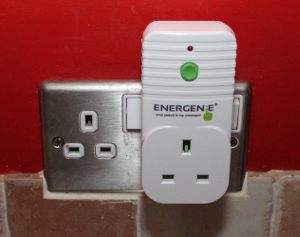
This can also make use of Pi-power which is a simple home automation based around the Raspberry Pi and Energenie remote control. Details of this are available in the video below and at the Raspberry Pi home automation with Pi-Power.
I have written a web interface using Python which allows the sockets to be turned on using a simple remote control interface that can be accessed on a computer or mobile phone on the local wireless network. The web app uses Python GPIO Zero and the Python bottle web framework. The bottle web framework is a simple way to create a web application with a built in web server rather than needing a separate web server such as Apache.
The Pi-power interface can also be used to control the aquarium light on a timer using crontab. This is all explained on the Pi-power home automation page.
Please view the copyright information regarding use of the circuits.

