- Home
- Learn Linux
- Learn Electronics
- Raspberry Pi
- Programming
- Projects
- LPI certification
- News & Reviews

Google Ads
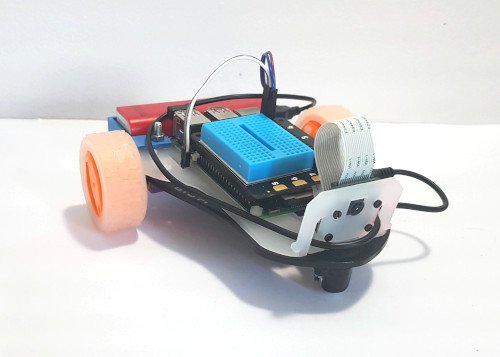
This is the STS-Pi robot from Pimoroni. It comes with a chassis, two motors and wheels, an omnidirectional wheel and camera mount. You need to add your own Raspberry Pi and battery. You also need a motor controller which they recommend an Explorer HAT, Explorer HAT Pro or Explorer pHAT.
It comes with a battery holder for a cylindrical battery, but it did not fit the battery I had. I have therefore created a battery holder designed in FreeCAD which I then 3D printed. This is explained later.
The code used in the demo is designed for control using a keyboard. You will need to launch the application first and ensure it has focus which can be achieved using an external screen or VNC.
#!/usr/bin/python3

import sys, tty, termios

import picamera, time

from gpiozero import Robot


# Pin numbres

# CamJam 10,9 - 8,7

# STS-Pi 19,20 - 21,26


robot = Robot(left=(19, 20), right=(21, 26))

camera_enable = False

try:

    camera = picamera.PiCamera()

    camera.hflip=True

    camera.vflip=True

    camera_enable=True

except:

    print ("Camera not found - disabled");


photo_dir = "/home/pi/photos"


# get a character from the command line

def getch() :

    fd = sys.stdin.fileno()

    old_settings = termios.tcgetattr(fd)

    try:

        tty.setraw(sys.stdin.fileno())

        ch = sys.stdin.read(1)

    finally:

        termios.tcsetattr(fd, termios.TCSADRAIN, old_settings)

    return ch


# list to convert key presses into motor on/off values to correspond with the direction

# direction based on number keypad

# 8 = fwd, 4 = left, 5 = stop, 6 = right, 2 = rev

# the key for the list is the character

direction = {

    # number keys

    '2' : "backward",

    '4' : "left",

    '5' : "stop",

    '6' : "right",

    '8' : "forward",

    'w' : "forward", 'a' : "left", 'd' : "right", 's' : "stop", 'x' : "backward"

}


current_direction = "stop"

# speed is as a percentage (ie. 100 = top speed)

# start speed is 50% which is fairly slow on a flat surface

speed = 50


print ("Robot control - use number keys to control direction")

print ("Speed " + str(speed) +"% - use +/- to change speed")


while True:

    # Convert speed from percentage to float (0 to 1)

    float_speed = speed / 100

    if (current_direction == "forward") :

        robot.forward(float_speed)

    # rev

    elif (current_direction == "backward") :

        robot.backward(float_speed)

    elif (current_direction == "left") :

        robot.left(float_speed)

    elif (current_direction == "right") :

        robot.right(float_speed)

    # stop

    else :

        robot.stop()


    # Get next key pressed

    ch = getch()


    # q = quit

    if (ch == 'q') :

        break

    elif (ch == '+') :

        speed += 10

        if speed > 100 :

            speed = 100

        print ("Speed : "+str(speed))

    elif (ch == '-' ) :

        speed -= 10

        if speed < 0 :

            speed = 0

        print ("Speed : "+str(speed))

    elif (ch in direction.keys()) :

        current_direction = direction[ch]

        print ("Direction "+current_direction)

    elif (ch == '0' and camera_enable == True) :

        timestring = time.strftime("%Y-%m-%dT%H.%M,%S", time.gmtime())

        print ("Taking photo " +timestring)

        camera.capture(photo_dir+'/photo_'+timestring+'.jpg')

robot.close()
This can be 3D printed and increases the choice of different batteries which can be attached to the robot. It is recommended this is attached using M4 metal screws (rather than the nylon M5 screws which are used for the supplied bracket).
The STS-Pi includes a mount for a camera, but I wanted to use it with a ultrasonic distance sensor to reduce the risk of collisions. I first created a bracket that replaced the camera bracket with one for an ultrasonic distance sensor. I then extended that to add holes for the camera mount that comes with the STS-Pi robot. It does mean that it's a bit "top heavy", but it does work.
The collision avoidance / collision detection code is quite simple. It measures the distance between objects it detects and when it comes too close it turns a short way right. This works fairly well, however whilst the ultrasonic sensor is good at detecting objects in front of it, if they are at an angle then the sensor can sometimes struggle to see the object. This is useful as an initial demonstration of how collision avoidance can be implemented. You may want to look at adjusting the distance based on your own setup.
For the latest updates please:
Subscribe to the PenguinTutor YouTube Channel
and
Follow @penguintutor on Twitter
Please view the copyright information regarding use of the circuits.

