- Home
- Learn Linux
- Learn Electronics
- Raspberry Pi
- Programming
- Projects
- LPI certification
- News & Reviews

Google Ads
The Raspberry Pi Pico is a small microcontroller board. It's not a full desktop style computer in the same way that the traditional Raspberry Pi is and it doesn't work with a normal screen. This is a separate add-on screen designed specifically for the Raspberry Pi Pico.
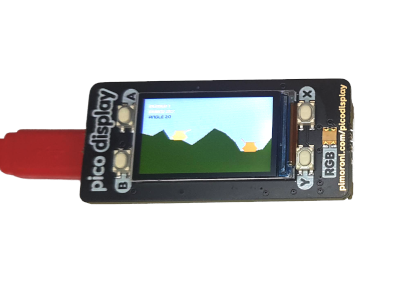
Unlike a Raspberry Pi HAT which fits on top of the Raspberry Pi computer, this is called a pack because it goes on the back of the Pico like a back pack. The display pack is one of the less expensive add-ons which is a bit surprising considering it’s capability. Although it’s still many times more than the cost of a Pico.
The display pack a miniature screen a little over an inch in size. with a resolution of 240 x 130 pixels. It also has 4 buttons and a single RGB LED.
This video explains about the game and some of the challenges I faced when porting a game from Pygame Zero to the Raspberry Pi Pico.
Here I'll highlight some of the differences between writing code in Pygame Zero and for the Raspberry Pi Pico. This is mainly from the point of view of a vector based game. I'm currently working on an alternative for a bitmap based program (such as using a Pygame Zero Actor class).
You can take a look at the source code to help understand how programs can be written for the Pico Display.
The following are some hints that may help when converting code from Pygame Zero to the Pico.
To access the libraries for the display pack you will need to install the Pimoroni verison of MicroPython. This can be downloaded from Pimoroni guide to getting started with the Pico.
One of the first things is the choice of editor. Whilst you can develop for either platform using any text editor the Mu editor is best for Pygame Zero (due to Pygame Zero integration) and the Thonny editor for the Raspberry Pi Pico (as it can save and run files directly on the Pico).
When making changes (particularly to OOP classes) then you may need to restart the Pico by disconnecting and reconnecting the USB connection.
When intialising the display then you normal create an object called display, picodisplay or similar. As this is initialised at the start of the code that object can be passed to the constructure of your classes so that they can access the information about the display.
The code to interface with the display typically just updates the display buffer. The update() method needs to be called to update the display otherwise you won't see anything.
The MicroPython libraries do not currently support polygons. To create images then you can create them as individual pixels:
display.pixel(x, y)
a horizontal line of pixels
display.pixel_span(x, y, l)
or a rectangle:
display.rectangle(x, y, w, h)
You can also create circles using:
display.circle(x, y, r)
Instead of specifying the color each time the Pico works by setting the display color and then future updates will be in that color. This is more efficient if you have several updates to make in the same color, but may be less efficient if drawing with lots of different colors.
The buttons can be accessed using the is_pressed method. For example to test if button A is pressed then you can use:
if (display.is_pressed(display.BUTTON_A) == True):
The micropython method has no methods that allow you to read data from the screen. You can however access the bytearray directly, but you will need to convert the image into the correct format. In particular the lowest 2 or 3 bits are dropped from the colour values. This is best explained in the video, but the following code snippets show how you can convert colour from the RGB format to the byte array format and how you can access the pixels from the display byte array.
def color_to_bytes (color):

    r, g, b = color

    bytes = [0,0]

    bytes[0] = r & 0xF8

    bytes[0] += (g & 0xE0) >> 5

    bytes[1] = (g & 0x1C) << 3

    bytes[1] += (b & 0xF8) >> 3

    return bytes
def get_display_bytes (x, y):

    buffer_pos = (x*2) + (y*width*2)

    byte_list = [display_buffer[buffer_pos], display_buffer[buffer_pos+1]]

    return (byte_list)
Whilst the Pico is quite respectable for a microcontroller it is not the same as having a full computer. As a result care needs to be taken to avoid performance issues. In my case I made the artillery shells move faster by increasing the distance they moved in each frame, and I also did the same for the adjustment of the power and angle for the user entries.
There are other performance factors that I could have looked at, perhaps storing the tanks calculations so they can be blitted direct into the byte array but I haven't yet investigated them further.
I'm currently working on how bitmap based sprites can be used on the Pico Display. Due to the size of the Python png libraries and due to performance reasons I am looking at how an image can be stored as a binary memory image and be displayed on the screen.

