- Home
- Learn Linux
- Learn Electronics
- Raspberry Pi
- Programming
- Projects
- LPI certification
- News & Reviews

Google Ads
In this tutorial you will learn how to make a basic shape for a game. This shows a basic shape suitable for use in the Space Asteroids Pygame Zero game for Raspberry Pi. During the tutorial you will learn about how to get started with Blender; how to create, modify and delete objects; how to add a material to change the objects colour; and how to export the 3D model as a 2D image.
The tutorial is available on the video below, or scroll down for full instructions.
If you follow through this tutorial then you will have created the basic shape of a missile used to blast asteroids to pieces and save the world from an asteroid shower. This is actually a very basic shape, but most of the time will be spent familiarizing yourself with Blender ready for bigger and better projects.
![]()
Before you get started you'll most likely need to install Blender. For those running Linux (such as a Raspberry Pi) then usually easiest to install using your package manager. Or you can download the latest version for any platform from the blender website.
Blender can be run on a variety of different platforms including a Raspberry Pi model 3 running Linux. Due to performance reasons I suggest running it on a laptop or desktop computer. I have included the instructions which are compatible with Raspberry Pi, Raspberry Pi Desktop or Ubuntu Linux, but you can also run Blender on other operating systems by Downloading Blender from the Blender website.
To install Blender open up a terminal window then enter the following commands:
After installing the Blender application will be added to the Raspbian menu under the graphics category.
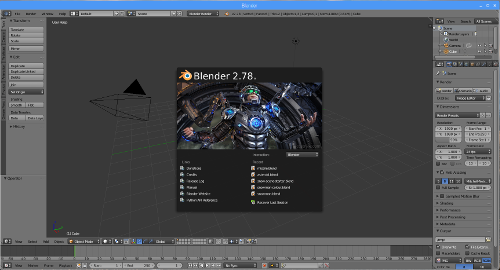
You can dismiss the startup screen by clicking on the workspace behind it. There should then be a screen with a cube (normally showing 3 arrows) and if you look carefully you will see a wire frame pyramid, which indicates the position of the camera, and a black circle surrounded by dashed lines, which indicates a light source. I have highlighted the camera and light source in the image below.

Before you get around to creating your missile you may want to get familiar with the basics first. Blender can be quite tricky to use when you first start out as it's so different from the way most other applications work. Once you've mastered the basics you'll find that there is a whole world of possiblities of what you can do.
The cube should be highlighted (outlined in orange) and there should be three coloured arrows representing the x, y and z axes. The red arrow represents the x axis, the green they axis and blue the z axis. If the arrows are not shown then you can select the cube by right-clicking on it. The cube can be moved around the screen by left-clicking and dragging on one of the arrows.
If you wish to resize or rotate an object then look for the transformation manipulators towards the bottom of the screen. You can see what the buttons look like in the image below

The left-button (showing green, blue and red lines) is used to show and hide the manipulators. The arrow is selected which is the move manipulator that you have used already. The curve button allows you to rotate the object (click on one of the coloured lines and drag in the appropriate direction). The final selector has a cube on the end of a line and is used to resize the object. Click that and then click and drag on one of the different coloured cubes which have replaced the arrows. You will see that you can change the size in one direction stretching the shape into a cuboid.
If you wanted to scale the entire object, keeping it in proportion then you can use the scale tool instead. First undo the changes to the cube. The undo option is on the Object menu which is in the unusual position of bottom left, as shown in the screenshot below. Then click undo. Alternatively you can use the shortcut CTRL-Z.

To scale the image now choose the Scale option which is on the tools tab in the top left.

You can now move the mouse and the shape will scale as appropriate. You can then left-click when you have reached the desired size.
Creating 3D objects can be a challenge, because you've got to know how it looks from all the different angles. If not it's possible to create a model that looks perfect from the front, but where the top and bottom are so far apart along the y axis that they never even touch.
I'm going to assume that you are using a proper mouse with mouse track-wheel rather than a laptop touchpad. If you haven't got such a mouse attached then go and find one before continuing. If you haven't got a proper mouse to hand then go to the shop and buy one. Seriously, whilst it is technically possible to navigate around Blender using a touchpad or even a Mac mouse with only one button, it just adds to the complexity which is not what you need when learning Blender.
To zoom in and out then use the mouse wheel. To pan around the screen then hold down the track-wheel (or centre mouse button if you have a 3-button mouse) and move the mouse around the screen. This will change the view by rotating around the centre of the screen (stage). Note that this only changes the view when you are editing, it does not change the view when you export an image (see later).
So far you've just been getting familiar with the interface. Now we can look at creating some basic shapes. At last!
We no longer need the cube in the screen so that can be deleted. First make sure the shape is selected (right-click if not outlined in orange) and then press the delete key, or choose delete from the tools. It will ask for confirmation before deleting the object.
To add a new shape, then choose the Create tab in the top left corner. This brings us the add primitive menu. See below:
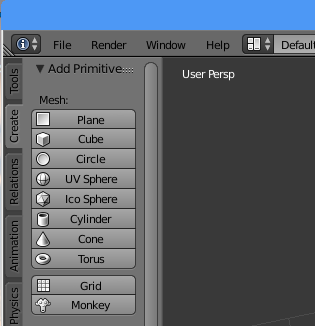
As you can see there are some common 3D shapes as well as the special Monkey shape. Click on the Cylinder to add a new cylinder onto the screen. The cylinder will be positioned centered around the right and white cross hairs. You can move the cross hairs by left-clicking to an appropriate position, which will change where future shapes are position. Click above the cylinder and then choose Add Cone from the add primitive menu.
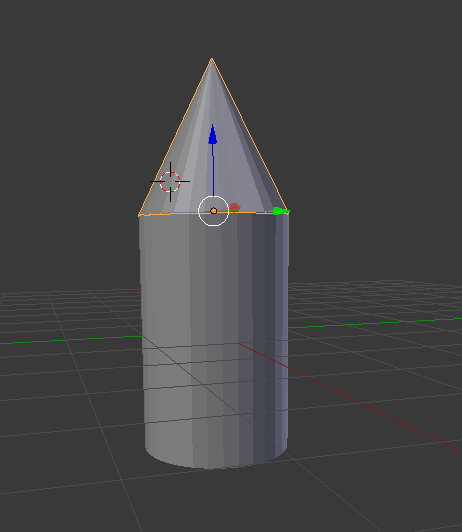
You should now have something that looks a bit like the image below:

You can now move and scale the objects as required. Note that if you try and resize either of the shapes on the x or y axis then you will distort the shape. Instead use the scale option as expored previously.
You may need to move around the shapes to see them from different angles to make sure that they line up correctly.
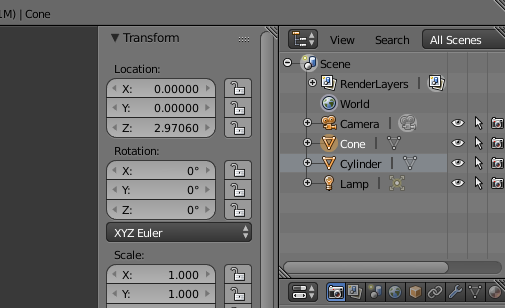
An alternative if you want to position the shapes more accurately is to click on the small plus sign in the top right of the screen area. This opens up the Transform window which allows you to enter the exact values for the position. For exmaple set X and Y to 0 and you will position the shape in centre of the screen. Then you just need to adjust the Z position (using the blue arrow) to get the shapes lined up. See the image below:
After a bit of manipulation then it should be able to get the two shapes lined up as shown below:
Now is a good idea to save your progress if you haven't already. Choose Save As from the File menu and give it a name ending with .blend
You can then save your progress at any time using File -> Save.
You've now lined up the parts of the model, but when you export it as a 2D object, it can look completely different. This is because you have to factor in the position of the camera and any lights shinging on it (and the shadows where there is no light). This is done by asking Blender to render the image.
You can now see how the shape looks so far by choosing Render Image from the Render menu, or by pressing F12. When I do so on my computer then I get the following image:
![]()
As you can see above the top of the cone is missing. This is because of the position of the camera in relation to the shapes. Also the lighting is such that one side of the shape is completely black because it is in shadow.
The top of the shape being cut-off can be fixed by repositioning the camera. Press escape to go back to the edit mode. Next zoom out (using the mouse wheel) so that you can see the camera. The camera can be selected in the same way as an object (right-click) and then moved using the same tools as we used when manipulating the shapes.

Unfortunately it is quite difficult to get the view you are looking for using this method. As you can see in the render below moving the camera has left the shapes leaning towards the right.
![]()
The easiest way to fix this is to position your view to be what you want the camera to see and then choose the following from the bottom menu: View -> Align View -> Align Active Camera to View. See the menu below:
This will leave you in camera view, so go back to the View menu and choose the Camera option, which will put you back into the user perspective (now looking from behind the camera).
To remove the amount of shadow on the render you can now either reposition the light-source, which can be selected and manipulated like other objects, or add a second light source.
The light sources are added from the "Add Primitive" menu (the same that you used to add the shapes), but look for the section named Lamp:
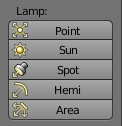
I chose to add a Point lamp which can be positioned at the opposite side of the camera to eliminate the shadow that was on the left.

Having now created a 3D model it's time to add some colour. I've gone for a nice white classic rocket colour, but I've added a red nose cone to remind everyone of the explosive payload - just perfect for blowing up asteroids.
In Blender this is achieved by specifying the material that the object is made of. In this case we just choose a material that is a single colour, but it could be different textures like wood etc.
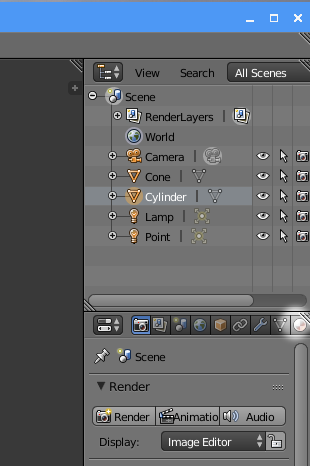
Start by selecting the cylinder shape. You can do this using the right-click as previously, or an alternative is to use the Scene box in the top right hand corner of the screen and click on the appropriate object (see below).

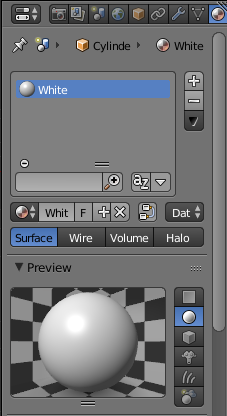
The Material selection button is also on the right, directly under the panel mentioned above. On the right there is a small circle with different colours in it which is shown in the image below:
Clicking on that will show an empty box as there are no materials currently defined. Click on the "+ New" button below to add a new material.

You can now rename the material by clicking on its name (shown as Material.001 in the above). For example call the first one "White".
Click on the colour shown in the Diffuse section below the preview and choose an appropriate colour. If you are familiar with HTML hexadecimal colour codes then you can also use the Hex option and enter the colour as a hexadecimal string. In my case I entered FFFFFF which is the code for white.
You will now have White in the materials box and the colour of the cylinder will change. Note that it still shows shadows on the shape so depending upon your view in relation to the light it may still look grey in places.
Now repeat the same steps, but choosing the cone and adding a red coloured material. It should now look like the image below:

Your 3D model is now complete. You just need to export it as a PNG file so that it can then be used as a sprite in your games.
Finally render the image again (F12) and then click on Image -> Save as Image on the menu in the bottom left.

This will save as a PNG file. Give it a filename, such as missile.png and click save. You can then view the file using the image viewer which should look something like the image below:
![]()
The image is looking good, but if you try and use it straight into a program such as one created with Pygame Zero, then you will notice that it has a large grey background. You also probably will want to crop the image to be closer to the object.
My favourite program for editing images is GIMP. Unfortunately I don't have time to go through learning a graphics editor as well (perhaps an idea for the future), so for now I'll leave that as an excercise for you to research.
So now you should have created a basic sprite shape using the 3D modelling tool Blender. In the process you've hopefully also learned a bit about Blender and how to use the different tools. There is still lots to learn about Blender, but at least you should have enough to have shown that learning a 3D modelling tool whilst difficult at first is quite achievable.
There are more guides to creating 3D models and use of a 3D printer at Penguintutor 3D design and 3D print projects
To see future updates please:
Subscribe to the PenguinTutor YouTube Channel
Please view the copyright information regarding use of the circuits.


