- Home
- Learn Linux
- Learn Electronics
- Raspberry Pi
- Programming
- Projects
- LPI certification
- News & Reviews

Google Ads
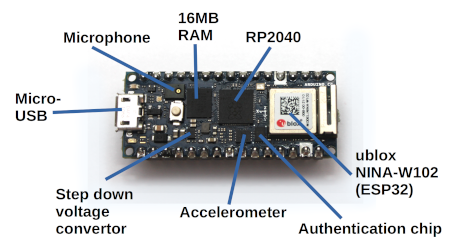
The Arduino NANO RP2040 is an Arduino microcontroller board based around the RP2040 microcontroller created by Raspberry Pi. This is the same microcontroller processor used on the Raspberry Pi Pico, but this board includes built in networking using WiFi and Bluetooth BLE. This is provided using a onboard ESP32 through the ubloc NINA-W102. The board also has a 16MB SPI memory chip (AT25SF128A). It includes a 6-axis accelerometer (Inertial Measurement Unit) based around the (LSM6DSOXTR). It also includes a microphone (MP34DT05).

This does cost considerably more than the Raspberry Pi Pico, but it also includes many more features. It's also in a much smaller package, so despite it's cost it is certainly worth considering when looking for a microcontroller for your next project.
To add this board you will need a modern version of the Arduino IDE. This can be downloaded from Arduino.cc. You should choose the ARM 32bit version if installing on a Raspberry Pi. You will then need to add the board through the board manager, search for RP2040 to find the correct board.
The board manager does take a long time to install the packages. On my Raspberry Pi 4 it took around 10 minutes. It's worth taking a break during the install so that you don't keep looking at the screen wondering if it's broken or not.
There is an slight issue when installing the board in that it needs to update the udev rules, but that can only be done as root. You will therefore need to run the following script after adding the board to the Arduino IDE, but before plugging in the Arduino RP2040 (or disconnect and reconnect after running the script).
sudo ~/.arduino15/packages/arduino/hardware/mbed_nano/2.1.0/post_install.sh
If you have installed a different version of the board packages then you may need to change the version number.
This should fix the problem of not seeing the board and you should now be able to select the board and the port it is connected to.
You should also install the WiFiNINA library from the library manager if you want to use the WiFi connectivity or to access the RGB LED (which is connected to the ESP32 rather than the RP2040).
You can use the blink example that is included in the Arduino IDE. This will blink the orange LED which is on the SPICLK port - GPIO5.
The RGB LED is conneted to the NINO W102 so it needs the WiFiNINA library to be installed. You can then access the individual colours in the LEDS as LEDR, LEDG, and LEDB.
There is a tutorial on using the Arduino Nano RP2040 as a wireless access point with web server. This is what I used in the video. See the Arduino RP2040 AP Web Server Tutorial for more details.
The Arduino Nano RP2040 Connect is considerably more expensive than the Raspberry Pi Pico. If you want a cheap microcontroller then you may be better off using the Pico, but if you want a powerful microcontroller with Wi-Fi and lots of additional features then it may be worth paying the extra for the Arduino RP2040.
Please view the copyright information regarding use of the circuits.

