- Home
- Learn Linux
- Learn Electronics
- Raspberry Pi
- Programming
- Projects
- LPI certification
- News & Reviews

Google Ads
This is going to show how Circuit Python can be used on a Raspberry Pi Pico to control an LCD display such as the one shown here.
I’ve created several projects using the LCD displays using a Raspberry Pi, BBC MicroBit and a Raspberry Pi Pico running MicroPython. This time I’m going to be using circuit python.
The finished project for this is an LED based reaction game. I’ve already explained about installing CircuitPython and controlling NeoPixels in an earlier video, and in a future video I’ll be showing the complete game.
In response to some of the comments on my other videos I’m going to go into a little bit more details about I2C and answer the questions about whether a level-shifter is needed for I2C or not.
This is based around a 16x2 LCD display, based around the Hitachi LCD controller HD44780. Most of the 1602 LCD dot-matrix displays use this IC or one that uses the same message protocol.
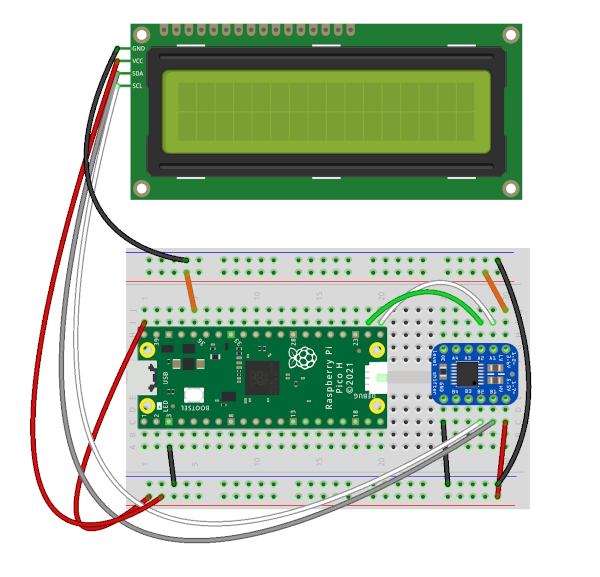
This can be connected directly to the Raspberry Pi Pico, although it is more likely that it will be connected through an I2C back-pack. This diagram below shows the LCD display wired directly to a Pico. You could used different GPIO ports on the Pico.

The HD44780 takes a parallel input, and as such needs a number of connections. Due to the number of gpip pins needed and the number of connections then it is common for the LCD display to be connected to an I2C backpack. The example shown is based around an i2c serial to parallel interface known as a PCF8574.
An alternative is the MCP23008 which can be used for I2C or the 74HC595 used for SPI. These are used by the Adafruit LCD backpack. If you have an Adafruit board then see the Adafruit CircuitPython guide for the mcp230xx / MCP23008 (i2c) or 74hc595 (spi). The rest of this guide assumes the board is based around the PCF8574.
The boards normally include I2C pull-up resistors. These are presumably included in an attempt to make it easier to use the boards when connecting to 5V microcontrollers (such as an Arduino), however that means that they could result in a 5V input to the GPIO pin on the Raspberry Pi Pico. This could risk damage to the Pico GPIO ports. In my own experience I have successfully used these directly connected to the Raspberry Pico with no problems, and I have used those on some of my projects. You should consider there is a risk of damage to the Pico if you do that, especially if you connect a lot of different sensors with I2C pull-up resistors.
The example below goes for the safe option of using a voltage level shifter. This is the adafruit bidirectional I2C level-shifter.
This is a simple example code showing how you can send messages to the LCD display. This is written in CircuitPython for the Raspberry Pi Pico. If you have not used Circuit Python before then see the following guide for getting started: Setting up CircuitPython on the Raspberry Pi Pico and installing libraries.
"""

CircuitPython LCD display demonstration

"""

import board

import busio

import time

from lcd.lcd import LCD, CursorMode

from lcd.i2c_pcf8574_interface import I2CPCF8574Interface


# Pin definitions

# I2C used for LCD Display

i2c_scl = board.GP17

i2c_sda = board.GP16

i2c_address = 0x27 # 39 decimal


# LCD display info

cols = 16

rows = 2


# Setup LCD display

i2c = busio.I2C(scl=i2c_scl, sda=i2c_sda)

interface = I2CPCF8574Interface(i2c, i2c_address)

lcd = LCD(interface, num_rows=rows, num_cols=cols)

lcd.set_cursor_mode(CursorMode.HIDE)


def main ():


    lcd.clear()

    lcd.print ("Starting...")


    time.sleep (2)


    lcd.clear()

    lcd.print ("About to start\nthe timer")


    time.sleep (2)


    count = 0

    while True:

        lcd.clear()

        lcd.print ("Counting:\n"+str(count))

        count += 1

        time.sleep(1)


if __name__ == '__main__':

    main()
Related projects using the Pico
Please view the copyright information regarding use of the circuits.

