- Home
- Learn Linux
- Learn Electronics
- Raspberry Pi
- Programming
- Projects
- LPI certification
- News & Reviews

Google Ads
The ESP32 is a microcontroller which has built-in WiFi networking and Bluetooth. It is a popular microcontroller for use in make projects making it easy to interface with electronic circuits wirelessly.
The ESP32 is a microcontroller similar to the Arduino and Raspberry Pi Pico. The ESP32 has advantages in terms of speed. It’s certainly much faster than the classic Arduino, and it’s clock speed is higher than the Pico, although performance really depends on what you are using it for.The main reason to consider the ESP32 is it’s built-in wireless capability. It includes the ability to use as a Internet Of Things device without needing to be tethered to another device.
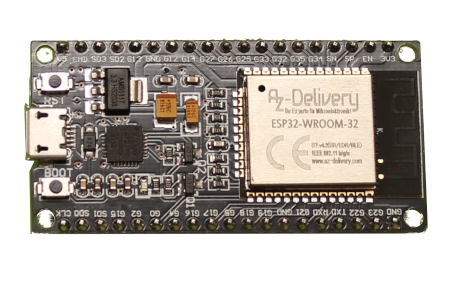
The ESP32 is actually a series of microcontroller chips produced by Espressif Systems in China. The ESP32 is the second generation of devices, which replaces the ESP8266. These are available as surface mount modules which are often included in wireless maker boards (including Arduino WiFi boards). There are also lots of development boards based directly around the ESP32 and similar chips. The particular board I am using is the AZ ESP32 Dev KitC V2 ESP32-WROOM-32. There are newer version of this board available, but most work in a similar way. You should be aware of the different pin-out that some boards have. In the case of this particular board you can look at the labels on the board.
It is possible to program the ESP32 using the toolchain provided by Espressif, but the alternative is to use the Arduino IDE. The Arduino IDE is a platform that many will be familiar with and is easy to configure so it is the one I will use here. I have installed it on a Raspberry Pi.
The code that works with the Espressif boards relies on some Python code running from the IDE. This needs Python version 3. Whilst Python 2 is now considered depreciated some Linux distributions still default to Python 2 due to some legacy code. In most cases it should not be a problem to switch to Python 3, but there is a chance that could cause problems. The method I suggest is for Debian based distributions (which includes Raspberry Pi OS and Ubuntu). This will make it easy to switch back if you need to.
From the command-line (terminal) run the following commands:
sudo update-alternatives --install /usr/bin/python python /usr/bin/python2.7 2

sudo update-alternatives --install /usr/bin/python python /usr/bin/python3 3

sudo update-alternatives --config python
The final line wil allow you to choose which version of Python you want as default, set that to Python 3. In future if you want to change back then just run the last line again and you can change back to Python 2.
Now you can install the Arduino IDE and add the relevant code. If you are on a Linux based computer (including the Raspberry Pi) then there will likely be a version of the IDE available to install from the distribution repositories, but that is often an older version. Regardless of your operating system I recommend you download a recent version from www.arduino.cc.
After installing the IDE you will need to add the board to the board manager. First go to the File menu and choose preferences. Add the following details into the field Additional Boards Manager URLs.
https://raw.githubusercontent.com/espressif/arduino-esp32/gh-pages/package_esp32_index.json
Click OK in the preferences window and now to to the Boards Manager, which is on the Tools Menu, then boards and then Boards manager. Search for ESP32 and install the board esp32 by Espressif. You can now select the appropriate board that most closely matches your board on the ESP32 submenu. In my case I choose ESP32 Dev Module and set the port to /dev/ttyUSB0.
The equivalant of programming Hello World is the blink code. This flashes the onboard LED on most boards (some boards may use a different GPIO number or not have an LED at all). Whilst the Arduino example library includes a blink program there needs to be a few changes to the pin details. The following code is an example that also uses the serial console to output a message.
/*

  ESP32 Blink

*/


// LED on GPIO2

// built in LED on many boards

int ledPin = 2;


void setup()

{

    // Set LED as output

    pinMode(ledPin, OUTPUT);


    // Serial monitor setup

    Serial.begin(115200);

}


void loop()

{

    Serial.print("Hello");

    digitalWrite(ledPin, HIGH);


    delay(200);


    Serial.println(" world !");

    digitalWrite(ledPin, LOW);


    delay(200);

}
Add this code to the IDE, save it and you should then be able to compile and upload it to the ESP32. If you get an error referring to serial.py then make sure you select Python 3 as the default.
If that works then congratulations you have uploaded your first program to the ESP32. See the project below for the next step.
See my project based around the ESP32
Please view the copyright information regarding use of the circuits.

