- Home
- Learn Linux
- Learn Electronics
- Raspberry Pi
- Programming
- Projects
- LPI certification
- News & Reviews

Google Ads
After a few years of neglect and constantly struggling with poor electrical connectivity, I’m finally giving my outdoor G-Scale garden railway the overhaul it deserves!
I first created this railway back in 2018. Over the years, I built bridges, steps, and had many great running sessions, but like many of you who run power through outdoor track, it was plagued by electrical connectivity issues. In this post, I'll share my methods for creating a reliable electrical connection without the nightmare of soldering directly to thick brass rails.
Please Subscribe to my channel if you find these videos useful.
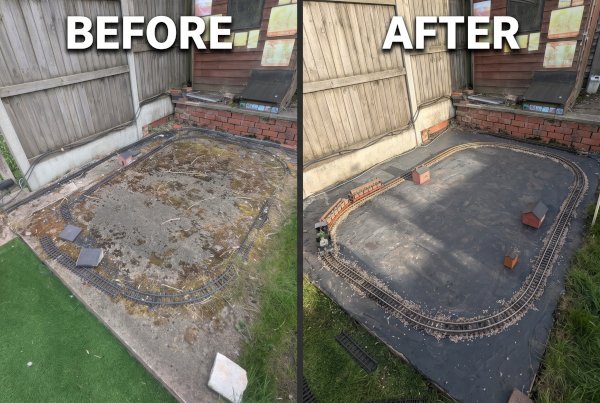
By the start of this year, the track was badly oxidized, covered in moss, and suffering from poor connections. Plus, a massive crack had formed in the concrete base. Running trains was impossible. I ripped all the track up and gave the concrete a heavy power wash.
To fix the crack, I used a self-levelling compound. Because my garden isn't level, I mixed it a bit thicker than normal so it wouldn't just run off the edges. Once dry, I painted it with outdoor masonry paint, going with a grey colour for a clean, industrial feel.
There are two main issues with track power: getting electricity to the track segments, and getting it from the track to the locomotive. Let's look at the track wiring first.
I cleaned up my existing LGB track and sorted through some donated Playmobil track (fun fact: Playmobil track is identical to LGB). I don't solder directly to the rails anymore. The brass is so thick that it conducts heat away instantly, meaning you have to apply way too much heat to make solder stick.
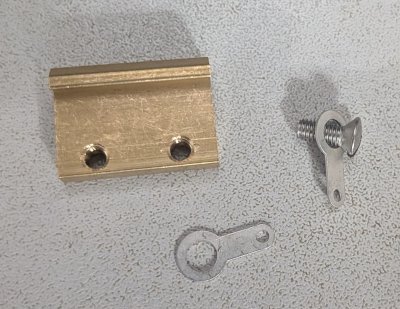
Applying conductive copper grease protects the metal from the elements while maintaining a solid electrical connection.
Between each brass joiner, I wired 0.75mm² white wire. The furthest any piece of track sits from a physical wire connection is just one section away. Finally, two main feeds connect to the track using mains rated electrical cable running back to the control point. These cables have the same wire gauge but the extra insulation on the main feeds helps protect the exposed cables.
Shortly after laying that fresh grey paint, the local birds decided to use it for target practice. A massive overhead canopy wasn't in the budget, so I came up with a removable solution using gardening mesh.
I supported it using 15mm plastic piping, slotted into 22mm pipe sunk into the ground. It’s not waterproof, but it keeps the droppings and leaves off the rails. To deal with the local cats and foxes, I've had to deploy a high-tech ultrasonic scarer and some low-tech pepper powder!
With the track wired and protected, it was time to lock it down. I used black Soudal Fix All High Tack adhesive, placing a few blobs in strategic spots.
For ballast, I skipped the expensive aquarium stones and went with chicken grit. It's a mix of stones and shells that looks incredibly convincing from a distance, and it's much cheaper!
To glue it down, I painted neat SBR (Styrene Butadiene Rubber) under the track, sprinkled the grit over, and packed it under the sleepers. After brushing away excess grit from the rails, I gave it a quick mist of water, then applied a 50:50 mix of SBR and water. It looks milky white when it goes on, but it dries completely clear and holds everything rock solid.
The trains run so much smoother than they ever did. There’s no jerking as it crosses joints, no speeding up and slowing down depending on how far it is from the power feed, and I can finally run locos reliably at slow speeds.
Next up is the larger outer track, adding artificial grass so I don't have to lift scenery to mow the lawn, and placing the 3D-printed and laser-cut buildings I've been working on. Thanks for reading, and be sure to check out the video at the top of the page to see the trains running!
Please Subscribe and click the bell icon to be notified of my future videos.
Also see:
To see future updates please:
Subscribe to the PenguinTutor YouTube Channel
Please view the copyright information regarding use of the circuits.


